Showing posts with label chocolate. Show all posts

Wednesday, 25 February 2015

Brown Butter Chocolate Chip Pretzel Cookies


I may be a chocolate + pretzel addict....

First I made these Salty Pretzel Chocolate Brownies and they were such a delicious chocolately salty soft and crunchy sensation that  my food imagination went into overdrive and I made these Salted Caramel Pretzel Chocolate Doughnuts.

It was only a matter of time before one obsession met another- 'browning' butter. You will notice a subtle caramel undertone in your cookies if you add brown butter AND it also makes this dough easy to roll into balls before baking.


Makes 2 dozen

100g butter
110g caster sugar
50g soft brown sugar
100g chocolate chips
175g plain flour
50g crushed pretzels
1 tsp baking powder
1 egg, lightly beaten
1 tsp vanilla

1. Brown 50g of butter by heating in a saucepan over a medium heat. When the butter starts to crackle, turn the heat down. Take off the heat when plenty of brown flecks appear and the butter goes silent. Leave to cool completely.
2. Cream 50g butter and the sugars in a bowl with an electric beater for 5-6 minutes. Add a third of the egg with a tablespoon of flour and beat well. Continue to use up all of the egg.
3. Add the vanilla and brown butter beat briefly for 1 minute.
4. Add the flour and baking powder and mix until fully combined, but try not to get too heavy handed.
5. Finally fold in the pretzels and chocolate chips. Roll into a ball, wrap in clingfilm and leave in the fridge for 30 minutes.
6. Heat the oven to 180oC. Roll the dough into balls and place well spaced apart on a baking sheet.
7. Bake for 8-10 minutes until golden at the edges.

Sunday, 8 February 2015

Chocolate Coffee Pecan Buns


The weekend is my happy coffee time. If I drink coffee at work, I am usually feeling tired and in need of an energy boost. But at the weekend, I savour it. A good cup of coffee is a giant exhale, a high-five, a 'whoop' it's the weekend. 

And I won't just make a cup of coffee for anything. It has to be for something good. A great read, an interesting article, a cool podcast, a great episode of my favourite-right-now TV show. A good cup of coffee at the weekend cannot be squandered.

And just as the moment must be right, so too must the accompaniment. Enter soft pillowy dough and swirls of coffee chocolate pecan sweetness. God I am in LOVE with these buns. The dough recipe is taken from Donal Skehan's recipe for Swedish Cinnamon Buns,.

Yeah it has yeast in it so you need to hang around for an hour or so to let it rise and do 5 minutes of kneading if you don't have a food processor, but honestly it's extremely straightforward. I experimented with the filling, departing from the traditional cinnamon flavour and really do love the chocolate and chocolate combo. The coffee cuts through the sweetness of the milk chocolate and the pecan nuts provide a toffee tasting crunch. 

Because I am a hipster wannabe I baked them in a cast iron skillet. You can bake these buns free form on a baking sheet or in muffin cases. 

Go on.... Your weekend coffee deserves a worthy partner.


Makes around 12 rolls

200ml milk
1 sachet instant action yeast
55g butter, melted
55g caster sugar
375g plain flour
1-2 tsp salt

For the filling
40g butter
55g sugar
30g milk chocolate
1 heaped tsp instant coffee powder
1 tblsp cocoa powder
125g pecan nuts

1. Heat the milk and butter over a low heat in a saucepan or in the microwave until the butter is almost melted. Take off the heat, stir until the butter is fully melted, add a teaspoon of sugar and allow to cool.
2. When lukewarm, sprinkle over the sachet of yeast and whisk well. Set aside for 5-10 minutes until the mixture becomes frothy. If it doesn't get frothy, then check the sell by date on your yeast and start again.
3. Put the flour, salt and caster sugar in a bowl. Add in the yeast mixture and mix until a ball of dough forms. Tip out onto a floured surface and knead for 5-6 minutes until the ball is smooth and no longer ragged.
4. Put the dough into a clean bowl, cover with a tea towel and leave to rise for 1 hour to 1.5 hours in a warm place like the airing cupboard or beside (but not on) a radiator, until doubled.
5. To make the filling, put the chocolate in a small saucepan with the butter and heat until evenly melted. Take off the heat and add the coffee and cocoa powder. Allow to cool and then add the sugar. Mix well until a thick paste forms.
6. Heat the oven to 190oC and chop the pecan nuts gently.
7. Punch the air out of the dough, tip onto a floured surface and roll into a rectangle 3mm thick. Spread the paste liberally and sprinkle over the pecan nuts, not forgetting the corners but leaving a 1cm border around the rectangle.
8. Starting at the long side roll the dough like a swiss roll to create a snail-like effect.
9. Once fully rolled up, use a knife to cut the dough into 12 pieces. Place cut side up into a cast iron skillet or a flat bottom pan suitable for the oven which has been greased and lined on the bottom with a sheet of baking paper. Leave an inch or so between each buns. Do not overcrowd or your buns won't cook properly and will be soggy. You may have one or two extra if your pan is as big as mine. Bake these free form on a baking sheet.
10. Leave the buns to rise for another 30 minutes and then brush with a little beaten egg for shine before baking for 15-18 minutes until golden.


Sunday, 17 August 2014

Black and white éclairs


Eclairs are the Coco Chanel of the dessert world; simple, timeless and elegant. I, for one, am incapable of stifling a gasp of admiration when presented with these glossy delicious choux pastries, a sweet-tooth's favourite since the turn of the nineteenth century. 

I have kept the flavours simple here, the eclairs are filled with chantilly cream and topped with chocolate ganache. And to add a little pizzaz I have used a decorating technique deceptively easy and eye-catchingly effective called 'feathering'. Try it out!


For the choux recipe click here.

For the chantilly cream
200ml cream
1 tablespoon icing sugar, sifted

For the topping
100ml heavy cream
50g dark/milk chocolate
pinch of salt
25g white chocolate

1. Heat the oven to 220oC.
2. Make the choux according to instructions on the link above. Pipe 12 x 3 inch lengths, well spread apart onto two baking sheets using a 1 1/2inch nozzle. Bake in the pre-heated oven for 15 minutes. Change position of the baking trays, reduce the temperature to 190oC and bake for a further 20-25 minutes.
3. Once golden brown and puffed up, take the eclairs out of the oven and cut each in half lengthways. If they are too hot, stab them to let the steam escape and then cut them lengthways later.
4. Beat the cream until soft peaks form. Sift the icing sugar over and fold in. Keep in the fridge until needed.
5. To make the dark chocolate ganache, break the chocolate up into a bowl with the salt. Heat the cream in a small saucepan until almost boiling then pour over the chocolate. Stir with a spatula in circular motions until all the chocolate is melted and the mixture is thick. Put in the fridge to cool until required.
6. To assemble, spoon or pipe the cream into the bottom half of the eclairs and replace the top.  Melt the white chocolate in the microwave or a small saucepan. Fill into a piping bag with a narrow nozzle.
7. Using a wide knife spread the ganche over the éclairs. While the ganache is still wet, pipe lines of white chocolate horizontally across the éclair parallel and at even intervals.
8. Drag a cocktail stick lightly up the long length of the éclair from bottom to top, creating the white chocolate pinnacles. Next drag the cocktail stick top to bottom creating pinnacles in the other direction. Repeat until you finish the design across the éclair.  For photos and guidance see here.

Monday, 16 June 2014

Salty Pretzel Chocolate Brownie


I am a commitment-phobe. No not the relationship kind but the kind that makes me run away from tying down any sort of weekend plans. It's not that I don't like doing stuff at the weekend, quite the opposite. It's just that I want the option not to do anything at all. I like nothing more than two days of possibility stretching out ahead of me.

Even if I only end up watching many many episodes of Nashville and having day dreams about becoming a country music star.

It's a matter of principle.

I also need some kitchen time at the weekend. So important. Chopping, mixing, turning up spotify, pouring, cooking. Good times.

I baked these salty pretzel chocolate brownies for an Orange is the New Black marathon a group of friends were having. They went down a treat! Crunchy and salty on the bottom, ooey gooey on top. Extra toffee on top to stick to your teeth is optional but highly recommended!


From bakersroyale.com

For the pretzel base 
1 cup and a half pretzels
3/4 cup plain flour
3/4 brown sugar
scant 1/2 teaspoon baking powder
1/2 cup melted butter cooled

For the brownies 
7 oz/175g milk chocolate
3/4 cup/150g butter
1/4 cup water
1 cup caster sugar
3/4 cup brown sugar
2 eggs, lightly beaten
1 teaspoon vanilla extract
1 1/3 cup plain flour
1/8 teaspoon salt
1/8 teaspoon cinnamon

1. Line a 9 x 13 x 2 inch tin with parchment paper.
2. For the pretzel base  put all the ingredients into a food processor and pulse briefly until the pretzels are big crumbs and the butter is evenly distributed.
3. Pour into the tin and pat down with the back of a spoon.
4. Bake for 10 minutes at 180oC. Leave to cool.
5. For the brownies melt the butter until almost fully melted in a heat proof bowl over a bowl of simmering water or in the microwave (but keep a keen eye on it!). Add the chocolate and heat gently stirring every 30 seconds until evenly melted and mixed.
6. In a clean bowl mix the flour, salt, cinnamon and sugars.
7. Make a well in the centre and add the eggs, vanilla extra, water and melted chocolate mixture.
8. Pour the brownie mix over the pretzel base.
9. Bake for 35-40 minutes until a crust has formed and when you insert a skewer it comes out barely moist.
10. For the topping melt 10 toffee sweets in the microwave until runny- this should take about 1 minute. Drizzle over the brownies. Add a careful sprinkle of good sea salt.

Saturday, 10 May 2014

Vegan Coconut Chai Ice Cream with Chocolate Shell


I am totally obsessed with the Mindy Project right now. It took me a while to get into it but now I just adore it. It is smart and witty, pop culture saturated. Hooray for weird characters on TV that eat too much saturated fat, battle through multiple work/life embarrassments and feel violently ill after exercise. That is someone I can relate to, being a girl who engages in strategic arm folding in order to cover food stains on clothes.

And because the casting is true to life the characters feel credible. I mean no one ever believed the Gilmore Girls were actually eating any of the junk they claimed to. I have a sneaky suspicion that those brown paper bags of supposed corn syrup badness from Doose's were actually filled with low calorie rice cakes and Lorelai and Rory would share one between them.

Honesty in TV is good! Note to the those network bigwigs who decide our programming fate- we can handle it! Except possibly the 'Girls' type of honesty which makes me hate my selfish selfish generation and disturbs me on a subconscious level.

Speaking of honesty I should probably be honest about this 'ice cream' because technically it isn't ice cream as it contains neither cream or eggs. Instead, full fat coconut milk is flavoured with warm chai spices. It was a big hit in this house and everyone agreed that you sacrifice neither taste nor texture by going vegan. I really couldn't lie to you after the above rant, could I?

For the ice cream  (inspired by cookieandkate.com)
2 x 450g full fat coconut milk
2 black regular teabags
1 cup boiling water
3 star anise
1 1/2 cinnamon sticks
8 cardamon pods, seeds removed
5 whole cloves
4 whole black peppercorns
1 slice ginger, peeled
1 cup sugar (if you want to be strictly vegan use 3/4 cup honey)
pinch salt
1 tsp rosewater

For the chocolate shell (from Joy the Baker cookbook)
130g milk chocolate, chopped (vegan friendly if you are being strict about it)
1/2 cup coconut oil
pinch of salt

1. Put all the spices and ginger with the tea bags in a small saucepan. Add the boiling water and bring to the boil.
2. Turn off the heat and add in the sugar. Stir until it dissolves. Allow to seep for 10 minutes.
3. Pour through a strainer throwing away the tea bags and spices. Add the rosewater to the liquid.
4. Put the coconut milk into a big bowl and add the chai concentrate. Mix well.
5. Pour into an ice cream maker and churn according to manufacturer's instructions, usually for about 20 minutes or until the thickness of frozen yogurt. If you don't have an ice cream maker just put into a tub in the freezer and mix every couple of hours to prevent ice crystals forming. Preferably freeze overnight if you aren't using an ice cream machine.
6. Pour into a bowl/other container and freeze for at least 4 hours.
7. For the chocolate shell put a bowl with the coconut oil and chocolate over a saucepan of simmering water. Don't let the bowl touch the water.
8. Stir until melted. Add the salt and keep warm until you are ready to serve.

Friday, 21 February 2014

Coffee and Chocolate Madelines


Are you there February 2014? It's me Deirdre, please don't leave me. I am hanging on like a bird in a tree during a tornado. 

I am on the study train again with exams looming which means I am pretty much eating everything I can get my hands on.

Today I ate this Heuvos Rancheros for dinner with guacamole and sweet potato chips but that just whet my appetite for delicious avocado so I made this Avocado Hummus with tortilla chips. Mexico meets the Middle East. I could eat that stuff with a soup ladle. I didn't obviously (warning not so obvious). Get this on your Friday night chat show food menu. Seriously.


This is the second time I have featured madelines. These are sort of a twist on the classic vanilla and almond and coffee and chocolate are a combination from heaven, there is no doubt about that. Crisp on the outside, soft on the inside, these babies won't make February slow down but they will ease the transition into March! 

From Will Torrent's Pattisserie at Home 

125g butter 
100g icing sugar 
30g ground almond 
30g plain flour 
1 1/2 tbsp cocoa powder 
a pinch of salt
1 1/2 instant coffee 
3 large egg whites 
2 tps honey 
1 tsp vanilla extract 

1. Brush the madeline tin with butter and dust with flour. Place in the fridge. 
2. Put the butter in a saucepan over medium heat and allow to melt. Continue to cook until it turns golden brown and the sizzling stops. This is browning butter. 
3. Sift the sugar, ground almonds, flour, cocoa powder and salt into a dry bowl.  
4. Whisk in coffee, egg whites, honey and vanilla with a balloon whisk. 
5. Finally whisk in the cooled browned butter. 
6. Cover the bowl with clingfilm and leave in the fridge for at least an hour, preferably overnight. 
7. Preheat the oven to 170oC. Place a heaped tablespoon of mixture into the holes in the madeline tin. 
8. Place in the fridge for 20 minutes so that a skin can form. 
9. Place in the oven for 10-15 minutes. Allow to cool completely in the pan and then ease out with a butter knife. 

Tuesday, 11 February 2014

Messy Chocolate Brownies with Salted Caramel Sauce


I'm Liz Lemon-ing my way around the world today. Shuffling from calamity to calamity in baggy pants and stained oversized sweatshirts while mumbling nonsensically to myself. And EVERYTHING is messy. The house, my handbag, my brain. Even my food. Especially my food.  Messy, messy messy. 

Nothing to do but embrace it. Or tidy up.....  

Brownies from Neven Maguire

200g (8oz) butter 
250g (10oz) caster sugar 
25g (1oz) pecan or walnuts nuts, roughly chopped 
275g (10oz) plain chocolate, finely chopped (I like a mix of dark and milk, 200g milk, 75g dark) 
4 eggs 
100g (4oz) self-raising flour 
75g (3oz) cocoa powder

1. Preheat the oven to 170oC. 
2. Line a swiss roll tin 30cm x 23cm/12 inches x 9 inches with deep edges (at least 5cm/2 inches deep). 
3. Melt 100g/4oz of the chocolate gently in the microwave or in a pan with the butter. Make sure to stir regularly. Set aside to cool. Chop the remaining chocolate. 
4. Beat the eggs with an electric beaters until they start to increase in volume. Dump in the sugar and beat until the eggs are a pale shade of yellow, thicker and doubled in volume. 
5. Sift the flour and cocoa powder into the bowl and then fold in gently until almost incorporated.
6. Add the cooled butter and chocolate mixture along with the remaining chopped chocolate and the nuts, if using. 
7. Fold until all combined being careful not to overwork as this will knock all the air out. 
8. Pour into the prepared tin and bake for 20 minutes. Then turn the tin around and bake for a further 10 minutes. The top should have a nice crust and be pillow firm to the touch. By that I mean you don't want it liquidy but you do want a slight wobble in the centre. 

For the salted caramel sauce - From Brown Eyed Baker

See picture tutorial here
200g/8oz caster sugar
90g/4oz butter cubed 
116g/5 fl oz cream at room temperature

1. Put the caster sugar in a dry, non-teflon large pan. The greater the surface area of the pan the easier it is to caramelise. Turn to a medium heat and watch like a hawk. 
2. When the edges begin to darken gently swirl the pan so that the undissolved sugar mixes with the caramel. Once all the sugar has melted do not stir. 
3. Allow to cook over a medium heat until it is an amber brown. If you have a sugar thermometer it should read 350oF. Even if the sugar has crystallised, keep cooking. It will all come good once you keep the heat low! 
4. Once you have reached the right temperature or the right colour take off the heat and add the butter. The caramel will sizzle but continue to stir cautiously. 
5. Finally pour in the cream, stirring continuously. The sauce should become glossy and thick. 

Note: If you feel like your caramel smells suspiciously like burning and you don't have a sugar thermometer fill a sink with cold water and plunge the bottom of the saucepan into the water. This will stop the cooking process. Have a quick taste (let it cool first!) and if you think it needs more cooking put back on the heat.  


Friday, 25 January 2013

Marble Bundt Cake


I like snow. When I have no where to go and no intention of leaving the house that is. Otherwise it is a complete pain in the derrière.  I won't forget cycling to an exam in a blizzard in final year or spending five hours on a bus to get home from college for Christmas- a journey that usually takes one and a half hours. But when you are aren't inching cautiously around in a car you can enjoy the benefits of snow. Firstly the panoramic snowy scenes and the satisfying crunch of the snow beneath your shoes. Secondly the freezing weather provides an excuse to stay inside, put on the fire and eat plenty of cake, bundt cake to be exact.

This marble bundt is what Nigella would call a 'spruced up' simple Victoria sponge.  The result is a pretty buttery sponge that is easy peasy and would impress the heck out of guests if placed on a table as an after party treat.

But first a few snaps of an Irish winter.


For a 1L Bundt Tin
225g butter or margarine softened
225g caster sugar
4 large eggs
225g self raising flour sifted
1 tsp vanilla extract
2 tablespoons of milk
2 tablespoon unsweetened cocoa dissolved in 3 tablespoons of boiling water, allowed to cool

To prepare your bundt tin- brush with melted butter or spray oil then dust lightly with flour. Knock out the extra flour by giving the tin a whack upside down over the sink. Don't forget to brush the inside ring! Place in the fridge for 20 minutes before putting the batter inside.

1. Beat sugar and butter with an electric mixer until soft and light in colour- 5-6 minutes.
2. Add the egg one at a time with a heaped tablespoon of the flour. Beat well after each addition.
3. Fold in the flour gently, or beat on slow with the beater.
4. Divide the batter in half roughly. Into one half mix the cocoa powder gently. To the other add the milk and vanilla and mix in well.
5. Bake for 30-40 minutes at 180oC until a skewer comes out clean. All


Friday, 18 January 2013

Avocado Chocolate Cupcakes with Cream Cheese Chocolate Frosting


This week I started yoga classes and ate quinoa 'superfood' for the first time and I am feeling rather proud of myself. This wholesome living is, of course, completely isolated from an incident involving a tin of danish butter cookies and my heartfelt late night goodbye to Friday Night Lights, a TV show I become quietly addicted to two months ago. ('Hey Y'all' to all the Tim Riggins fans out there). In my defence the cookies come in this adorable tin with toy solider design and are butter-meets-sugar heaven. My favourites are the squares ones covered in granulated sugar... Anyway like I said this has nothing to do with that

Vegetables in our sweet stuff is a new major food trend. I like the thought of healthy-ing up my baking and messing around with flavours at the same time. I tackled beetroot chocolate cake first here and now it is my go-to crowd pleasing chocolate cake. Now I am going all the way and cutting out butter and eggs with these vegan avocado cupcakes. I am not a fan of using oil in baking, I think it leaves an after taste even when using vegetable or sunflower oil, but you only need 2 tablespoons here so there is no impact on taste. The moist avocado acts as a butter substitute giving a moist light crumb. 

You definitely wouldn't know there was avocado in them.  Probably best to only tell the guests after they leave their cupcake cases like this:

From Joy the Baker 
1 1/2 cups plain flour sifted 
1/4 cup cocoa powder 
1/4 tsp salt 
1 tsp baking powder 
1 tsp baking/bread soda 
1 cup caster sugar 
2 tablespoons of vegetable oil 
1/4 cup mashed ripe avocado (around 1/2 medium sized avocado) 
1 cup water 
1 tablespoon of white vinegar 
1 tsp vanilla extract 

1. Sift the flour, cocoa powder, baking and bread soda and salt into a bowl. 
2. In a separate bowl mix sugar, oil, avocado, water, vinegar and vanilla extract. 
3. Add the flour mixture to the avocado mixture and mix well to ensure there are no hidden pockets of flour. 
4. The batter will be very light. Fill the cupcake liners to over 2/3's full. The batter will not rise too much. 
5. Make for 18-20 minutes at 350oF/180oC until a skewer comes out clean. Let cool for ten minutes once out of the oven then transfer the cupcakes to a wire rack to cool. 

This cream cheese chocolate frosting is moreish and devine and a big winner with those who find normal buttercream too sweet as it is made with unsweetened cocoa powder. 

For the frosting: Frosts 12-14 cupcakes 
From Joy the Baker cookbook

100g cream cheese 
1/2 cup (100g) unsalted butter 
1/8 cup cocoa powder unsweetened (I use Bourneville) 
pinch of salt 
1 cup icing sugar sifted 
1 tsp vanilla extract 
1 tsp milk 

1. Allow the cream cheese and butter to soften at room temperature for 1-2 hours. 
2. Beat the cream cheese allow with an electric beater until soft and pliable. Add the butter and beat until the butter is broken down and mixed with the cream cheese. Add the cocoa powder and beat for 30 seconds until incorporated. 
3. Add the salt, icing sugar, vanilla extract and milk. Beat until well combined- 3-4 minutes. 


Wednesday, 13 June 2012

Chocolate Beetroot Cake


I feel like this post is going to an uphill battle... Some people have already seen the title and thought I've lost the plot, that I'll be changing my name to "Sun and Rain", handing out flyers outside Tescos about how vegetables have feelings and striking the downward dog pose in public places. I know Beetroot in a cake is weird. In fact it sounds completely disgusting but let me propose that this is the best chocolate cake I have ever eaten. Because it is. No lie. I was as hesitant as you are now. Only for my complete trust in the pure wisdom of http://iheartkatiecakes.blogspot.ie/ and http://www.donalskehan.com/ I would never have even tried it. But it is good, it is so so good.

Quite literally the proof is in the pudding. You don't taste the beetroot at all, but it makes the cake so moist and fudgy, dense and chocolately. Plus beetroot has low calories so it really is the healthiest chocolate cake you can make with no compromise on taste. 

Probably best not to mention to anyone that there is beetroot in it. Not until they tell you how amazing it is anyway. Because they will. Guaranteed. 

This is from Joy the Baker with slight amendments by myself 

2 medium beetroots washed 
6 oz unsalted butter 
1 cup of soft brown sugar
3/4 cup of caster sugar 
2 large eggs 
1 tsp vanilla extract 
2 cups of plain flour sifted
2/3 cup unsweetened cocoa powder sifted 
1 tsp baking powder 
1/2 tsp bicarbonate of soda 
50g good dark chocolate (70% cocoa solids preferrably)
1 cup of buttermilk, at room temperature 

Method: 
1. Put the beetroot unpeeled in a pan of boiling salted water and boil for 45 minutes until a knife runs through them. Leave to cool then peel and chop roughly. Put in a food processor or with a hand held blender pulse them until there are no lumps. Then measure 3/4 cup for this recipe. 
2. Beat the sugar and butter together for about 5 minutes until fluffy. Add the eggs one at a time beating briefly until all incorporated. Add a heaped tablespoon of the flour with each egg to stop the mixture curdling. Fold in the beetroot. 
3. Put all the dry ingredients into a bowl and mix lightly. 
4. Melt the chocolate in the microwave for 20 seconds or until fully melted. 
4. Put your buttermilk (at room temperature or else it will cause the chocolate to re-set), chocolate and vanilla essence in a jug. 
5. Add half the dry ingredients and half the milk and fold in gently but thoroughly. Continue with the rest of the dry and wet ingredients. 
6. Spoon into non-stick baking tins that have been lined with greaseproof/baking paper (this is worth your while!). It will make a three 6-7 inch pans or two 8-9 inch pans.  Your mix should look like this.


The fabulous hue of the beetroot doesn't come through in the cooked sponge so much. Which is actually a shame because it would be such an amazing coloured sponge!!
7. Bake for 27-30 minutes at 180oC. Use a skewer to tell if the cakes are done. The skewer should come out clean.
8. Leave to rest in the tins for 10 minutes then invert and sandwich with cream cheese frosting recipe to follow!


Thursday, 31 May 2012

Chocolate Malt Cupcakes and Individual Cupcake Stands


I know people extol the virtues of Ikea. How stylish they are, how cheap, how cheerful. I have one word for these people- FLATPACK. It is no fun, especially if you are about as DIY-friendly as a one eye-ed, one-armed almost-blind pensioner. Which I am. I have no skill in that area. One Christmas I got a Barbie Jeep from Santa and I was so excited (you could open the roof of the Jeep and it became this sort of caravan thing in fairness). Flash forward four hours later and Dad is trying to screw the jeep door to the windscreen and cursing under his breath because the instructions don't make sense and there is a mysterious piece, the purpose of which is one of seven mysterious of the world. I'm bawling and crying impatiently... But when I saw these individual cupcake stands I thought I could cope with sliding the three pieces together. And they are very easy to assemble, as well as a lot more sturdy than they look. At €2.95 from Kitchencraft they also don't break the bank. Adorable I think you will agree.


These cupcakes are an Eddie Rockets malt in a cupcake. By special request from the BF. I basically fiddled around with a few different recipes and am really really happy with these. Moist malty chocolate sponge with an airy, melt in your mouth malt frosting. Delicious! 


For the cupcake 
115g chocolate, preferably 70% cocoa solids
85g unsalted butter softened
175g light brown sugar
2 eggs, lightly beaten in a cup
185g plain flour
3/4 tsp baking powder
3/4 tsp bicarbonate of soda
60g ovaltine
75ml milk

Method:
1. Melt the chocolate in a microwave for 20 seconds at a time, giving a good stir in between.
2. Beat butter and sugar together until fluffy.
3. Pour in the eggs, quarter at a time with a heaped tablespoon of flour. Continue adding egg and flour until all the egg is gone. Give a good beating.
4. Fold in the dry ingredients.
5. Add the milk and fold in.
6. Bake for 20 minutes @ 180oC.

Icing recipe to follow!

Thursday, 19 April 2012

Peppermint Chocolate Mousse Cake


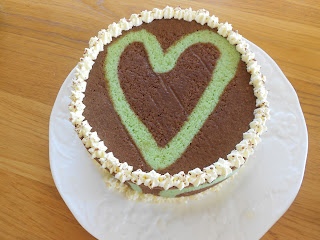
I love the Springtime, when the first glints of Summer pierce the endless cold and darkness of Winter. Evenings are my favourite time of the day, after 5-ish. On a Springtime Sunday the hustle and bustle of getting the big dinner is over and the house sighs with relief. Give me a cup of tea, a slice of cake and I'll curl up in the best armchair in the house like a old fat cat. This cake is really something special and I have to say I'm chuffed with the way it turned out. Its not as hard as it perhaps appears when you read the instructions. The sponge is actually quite flexible and so it is easy to manipulate it into the tin. The recipe I used told you to bake two big sheets of sponge and cut the circles top and bottom from it. Instead I just used the sponge tin to cook the circles- I thought that it would leave less waste and avoid that messy cutting out business. I then baked the rest on the mix in a rectangle tin and trimmed them to be the sides of my cake.

Adapted from the Great British Bake Off book

For the paste
100g unsalted butter softened
100g icing sugar softened
3 egg whites at room temperature
100g plain flour
green food colouring

For the sponge 
4 large egg whites plus 4 whole eggs at room temperature
15g caster sugar
150g ground almonds
150g icing sugar
25g plain flour
55g unsalted butter melted and cooled slightly.

For the mousse 
175g plain chocolate
2 sheets of leaf gelatine or 1 tsp powdered gelatine prepared according to packet instructions
2 large eggs separated
1/2 tsp peppermint essence
300ml double cream whipped.

2 x loose bottomed (preferably springclip tins) 18cm
1 x rectangular tin 20 x 23cm

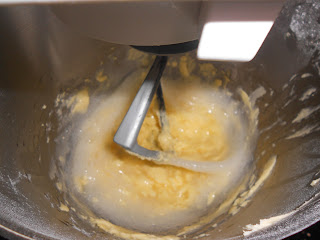
1. First for the paste. Beat the butter and sugar together until light and fluffy. Gradually whisk in the egg whites and continue whisking for 2 minutes. The mixture will look a bit suspect. Like this:

Yes it looks like a mess but reserve judgement. When you fold in the flour the mixture should come back together again. Using the tip of a knife add the colouring and fold in.
2. Pipe the paste into lined tins in swirls/patterns. I used two 18cm round cake tins and one rectangular tin, 30cm x 23cm.

The rectangular tin which will make up the sides of the cake


3. Leave the tins in the freezer for about 1-2 hours. This is important and cannot be skipped or else when you put your chocolate sponge mix on top the green paste will bleed into the sponge and you will lose your lovely design. 

4. Now to make your chocolate sponge. Beat the egg whites in a separate, clean glass bowl with the caster sugar until dry and stiff. They will not be as shiny as proper meringue as there isn't enough sugar but they should hold the trail of the beaters and form peaks. 
5. In another large bowl beat almonds, icing sugar and whole eggs for about 3 minutes until light, thick and increased in volume. Sift the flour and cocoa on top and then fold in. Finally fold in the melted butter. 
6. Pour over the tins and ease the mix around your designs. I tilted the tins to get the mix to fall itself. The layers should be thin, about 1 inch thick.
7. Bake in a preheated oven for 7-9mins @ 200oC until springy to the touch and golden. 
8. Turn out carefully on sheets of greaseproof laid over a cooling rack. Definitely don't skip this step, the sponge is quite sticky and will stick to your wire rack and make it impossible to get off without breaking it. 
9. Place one of your circles, pattern side out on the bottom of the cake tin you cooked it in. I lined the cake tin with cling film to make it easier to invert before I served. Cut the rectangle piece in half lengthways so you have two long pieces. Measure the circumference of the tin with a piece of string and trim the two pieces so together they are the circumference of the tin with about 1 inch/2cm extra.
10. Carefully lift one of the pieces are press it gently into the curve of the tin. The other piece should be about 1 inch/2 cm too long. Lift your longer pieces and press it into the curve tucking the long end in tight to the other piece of sponge so that this pressure holds the sponge together. 
11. Now for the mousse. Melt the chocolate gently in the microwave. Add the egg yolks and peppermint essence and mix until combined. 
12. If using leaf gelatine, soak the leaves according to packet instructions and then pop in the microwave for 10-20 seconds until fully dissolved. If you have lumps in the gelatine these will be nasty in the mousse. If using powder melt carefully according to the packet instructions. Allow to cool before folding into the mousse. Fold in the whipped cream. 
13. Beat the egg whites like you did with the sponge mix although they won't be quite so stiff. Fold into the chocolate mixture. 
14. Pour the mousse into the cake lined hollow you have made. Trim the side pieces so that the mousse is about 2cm from the top of the pieces. Press your top circle patterned side out on top. 
15. Leave overnight to chill. 
16. Run a knife around the edge of the cake and using the loose bottom push the cake up out of the tin. If you have a springclip tin you just need to open the clasp gently. 


17. Decorate with piped whipped cream and crumbled chocolate flake/grated chocolate. 

Ta to the Dah if I may say so myself


Friday, 13 April 2012

Lazy Girl Kitchen Sink Chocolate Slice


I'll tell you a shameful secret. I'm not a nice person when I'm tired... or hungry. I'm not talking sour and grumpy I mean demonic. You know when you are at a wedding or family occasion and some child throws a titanic tantrum, screeching like a banshee and drumming their heels on the floor..? The mother hushes and shushes red-faced while onlookers knowingly comment that the child is 'over-tired'. Well I'm the child in this scenario and last Sunday when we went for a misguidedly long mountainous walk, my mushroom hating boyfriend was that embarrassed Mother. At one stage I sat down on a rock and refused to move. When he tried to justify the steep incline by commenting on the lovely view of the lake and valley I told him that he had to be sado-masochistic to be enjoying himself and that he was going to have to cart me around in a golf buggy for the rest of my life. He is so good natured he just laughed at me. That may have infuriated me more...


Anyway the next day on Easter Monday the girls were coming down and I wanted to make something but my legs were killing me. Therefore the 'lazy girl kitchen sink chocolate slice' was born. It is sort of Rocky Road with what you fancy thrown in for sport.


Adapted from 'Scrumptious' by Diverse Abilities Plus

1 can of condensed milk
300g plain chocolate
1 tbsp golden syrup
75g butter
125g mini marshmallows
150g maltesers
100g digestive biscuits
175g raisins

1. Bash up maltesers and biscuits in a bag with a rolling pin. You want nice big chunks so go easy!
2. Melt condensed milk, chocolate, butter and golden syrup together in a pan over a GENTLE heat. Keep stirring regularly- there is nothing worse than the smell of burnt chocolate (apart from the smell of burnt hair but that is a whole other blog post)! Allow to cool for at least 5 minutes or your marshmallows will melt.
3. Add the rest of the ingredients and stir gently until all is combined.
4. Pop in the fridge for about two hours.

Sunday, 4 March 2012

Very Easy Rich Chocolate Pots with Shortbread Stars


I know drinking expresso is so very sexy, so cosmopolitan, so basking in the sun outside a cafe in Paris with a handsome French man like a scene out of La Vie en Rose, but I just can't approve of it. Not only do you look RIDICULOUS (men especially) squeezing your fingers into that tiny cup and then holding it like you'd imagine the Queen would a tea cup, but expresso tastes like tar marinaded in cigarette butts. Anyway when we got a set of super cute expresso cups for Christmas I didn't want to let them go to waste and thought they were the perfect size for mousse/creamy desserts. These chocolate pots are so rich that the expresso cup is the perfect portion size. Served with shortbread stars.

Its tempting to attack this in the bowl before it even gets to the cups. Use a spoon or you'll end up looking like this little guy but a lot less cute.


From Neven Maguire, Neven's Real Food For Families

Serves 6

450ml cream
75g golden caster sugar
1 tsp vanilla extract
3 tbsp Bailey's cream liqueur
250g good quality dark chocolate, broken up into squares
small pinch of salt
1 large egg, beaten lightly

Pour the cream into a large saucepan and add the sugar and vanilla extract. Warm for 3-4 minutes stirring now and then. Do not boil.
Remove from the heat and stir in the chocolate until you can feel no lumps, it has all dissolved. Then stir in the Bailey's with the salt and egg until well combined.
Pour into the expresso cups, cover loosely with foil/cling film and leave somewhere cold (but not in the fridge) for at least 4 hours or until set. Alternatively chill overnight but take out of the fridge an hour before serving.