Showing posts with label decorations. Show all posts

Wednesday, 9 January 2013

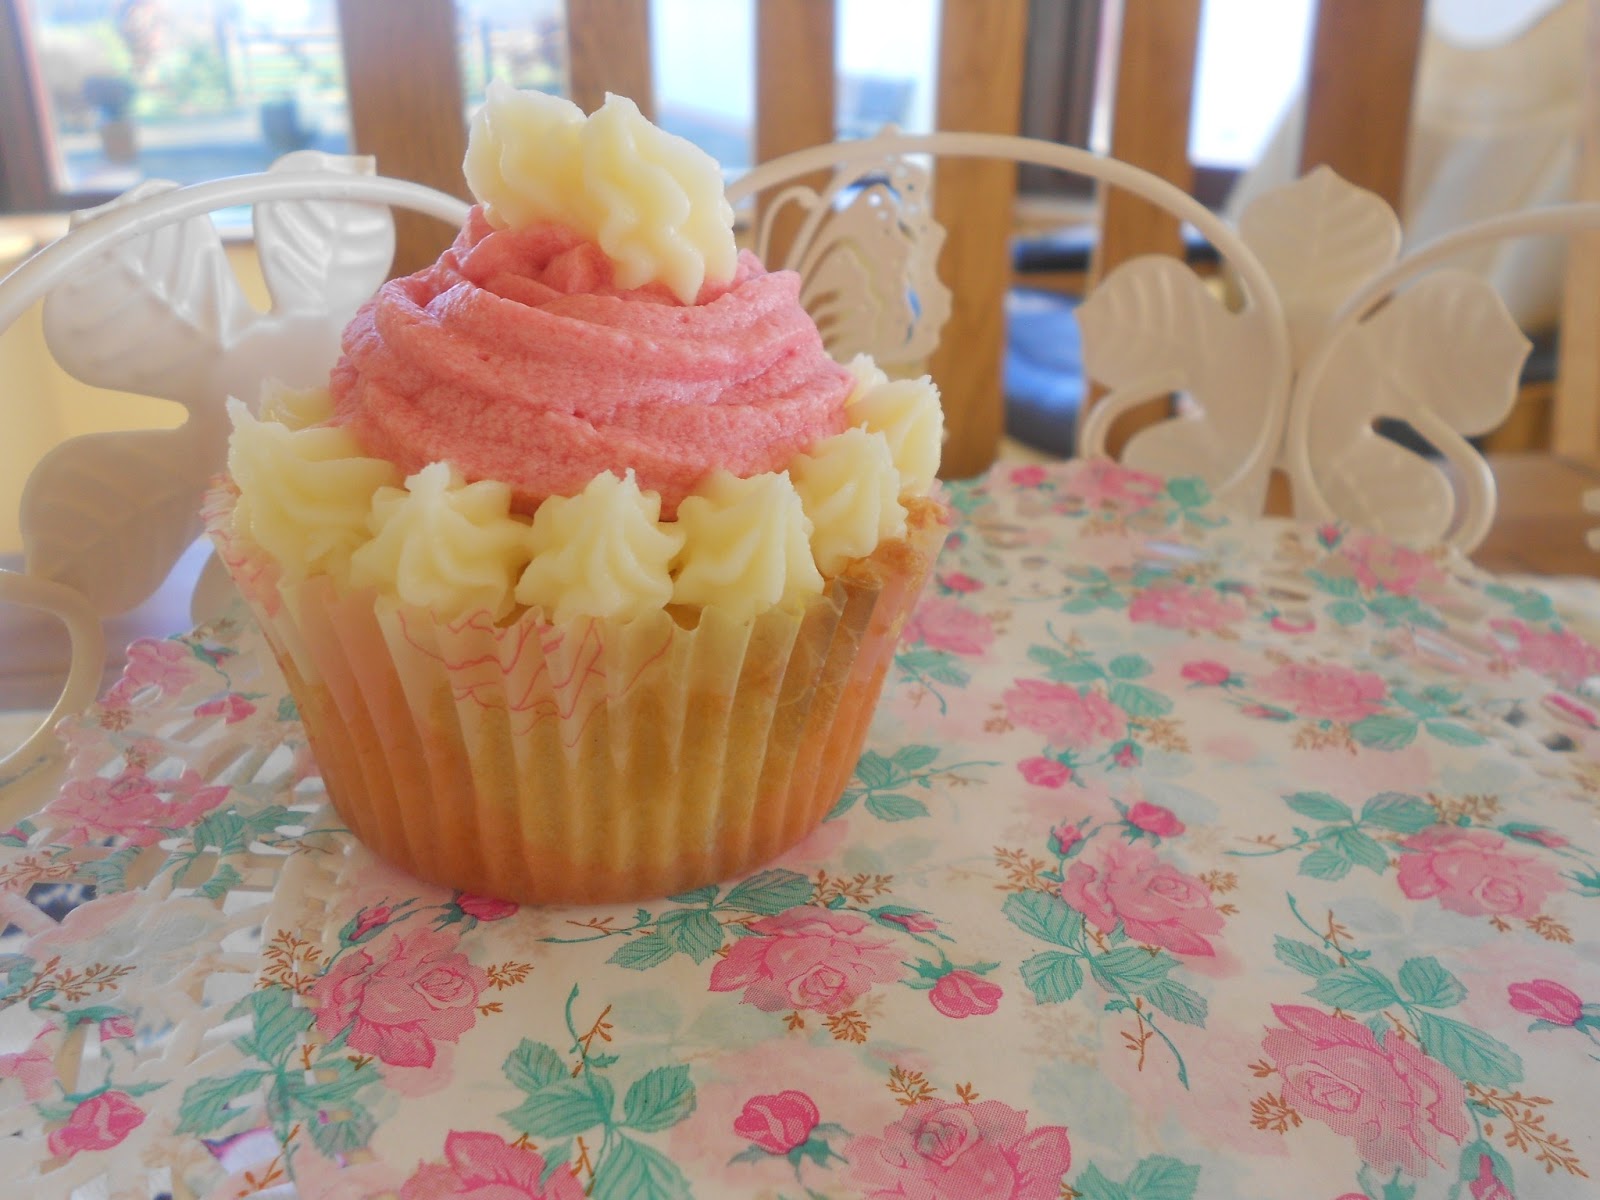
Natural Pink Raspberry Buttercream Icing


I never think that a drop or two of food colouring when I make my icing is going to harm anyone in the long term, but in an age where we are increasingly concerned about food additives, colours, e-numbers etc. etc. in our diets it is worth looking at natural way of adding colour to our baking. Berries are a great source of pink/red ink and also add a beautiful tang to cut through the sweet buttercream. It is easily done by adding shop bought unsweetened raspberry coulis or making your own which you could enslave children to do it is so simple. To me this buttercream tastes like those long cylindrical raspberry ice-lollies of childhood. Were they called Milky Moos?

For the raspberry coulis
1. Defrost 55g of frozen raspberries with a tsp of water for a couple of hours. When softened they will give out plenty of water. Mash with a fork. If using fresh raspberries you may need to add an extra 1-2 tsp of water.
2. Press the pulp through a fine sieve to get rid of the seeds.

Buttercream
75g butter softened
200g icing sugar sieved
2 tablespoons of raspberry coulis

1. Beat the butter and icing sugar together until the butter is a crumbed texture.
2. Make sure the coulis is warm/at room temperature. Heat in the microwave for 10 seconds if cold. Otherwise your buttercream may curdle.
3. Add the coulis and beat the buttercream for 3-4 minutes until lighter pink and there are no longer any lumps.

Saturday, 3 November 2012

Marzipan Heart design

I realised that I did a MISERABLE job of explaining how I put the heart into each slice of my rosette cake so I took a few more pictures. This is based out of the Great British Bake Off book 'Showstoppers' although I noticed in that that there are very few photographs on how it was done so I found my own technique which worked OK I think.... 

Tint the marzipan with colour- this will take quite an amount of time, even with good quality gel food colouring (don't use liquid colouring, it will leave the marzipan too sloppy). When the colour is evenly distributed, roll the marzipan into a sausage. Mould into a point at one end and the two rounded parts of a heart at the other. 

To make the two rounded parts I cut a line through the sausage with a sharp knife then carefully teased the two sides out to make the heart shape- like this photograph below. 


This is only a small segment of the full ring that I did. I put a layer of buttercream on my bottom layer. Pressed the moulded heart ring into the buttercream then top with more buttercream to cover the marzipan. Put on your top layer and voila! A really effective cute touch to any cake that is really not that hard! 


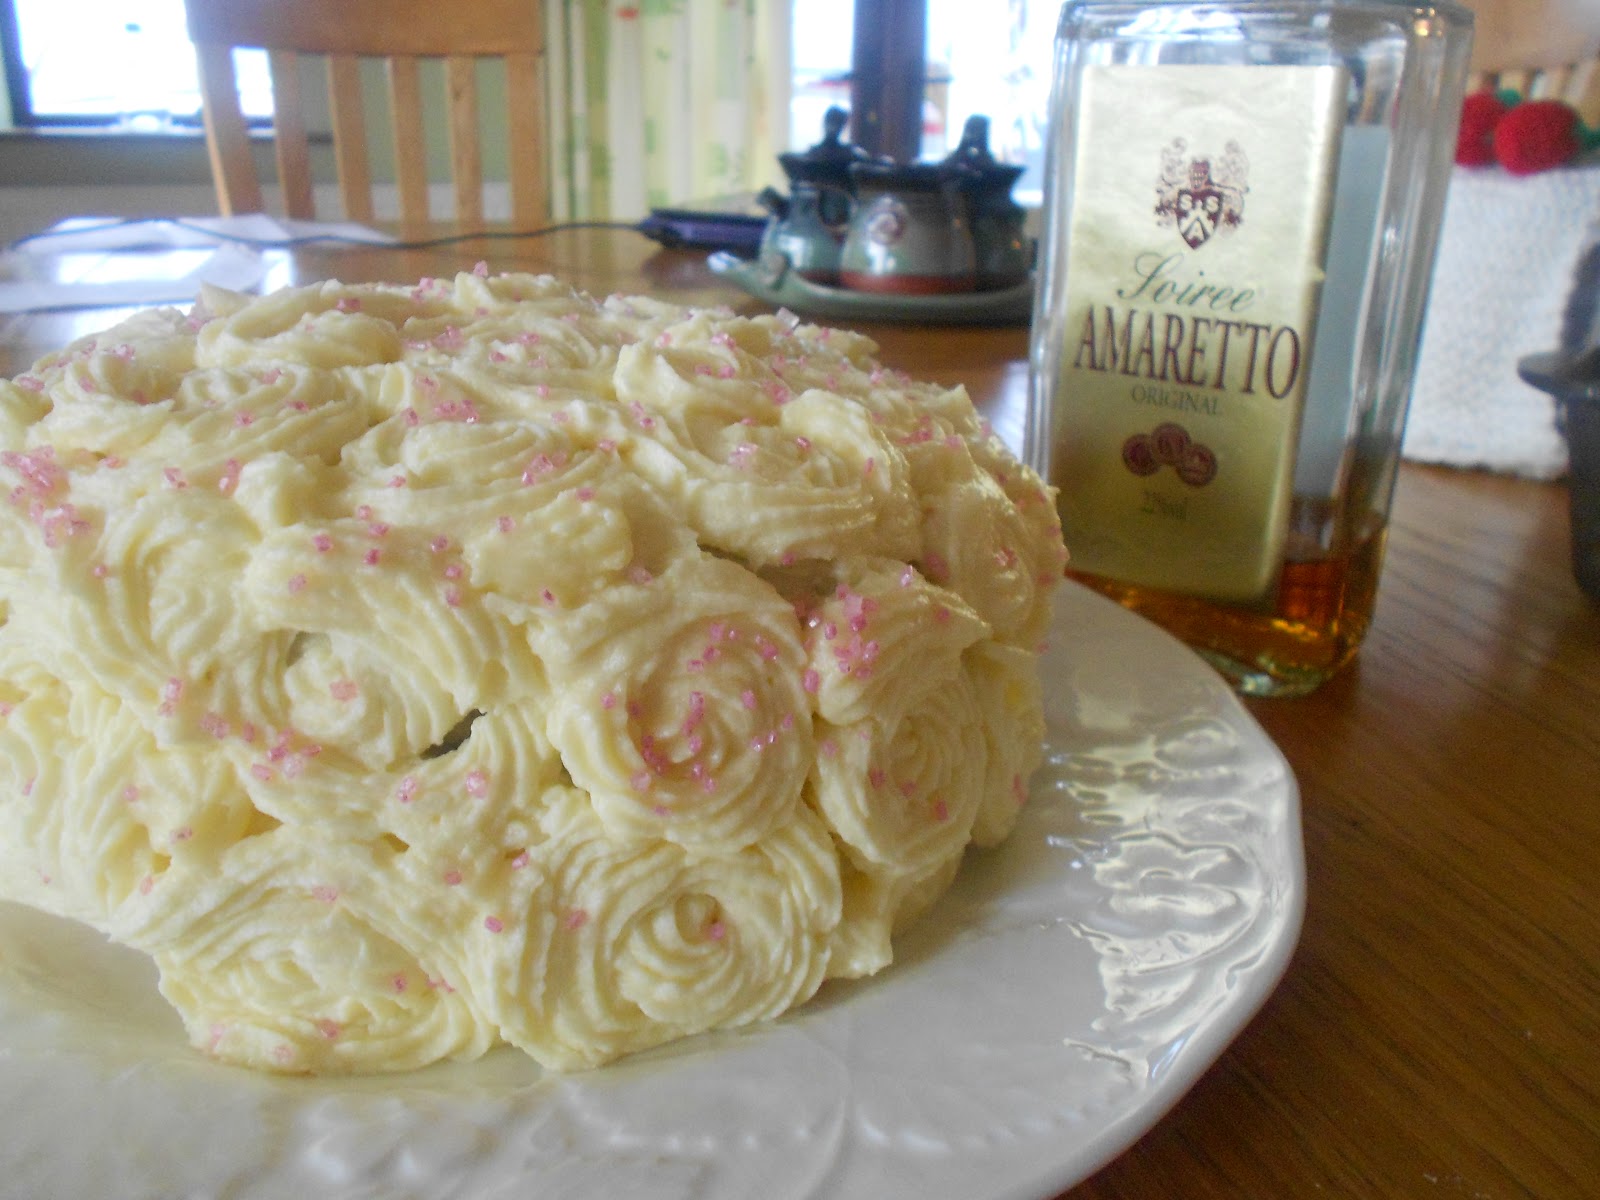
Amaretto Rosette Cake with Marzipan Heart and Irish Mammys


I wanted it to look like a wedding bouquet 


With a suprise heart inside 


Happy Birthday Mammy!! This was a design I've been wanting to try out ever since I flicked through the new Great British Bake Off Book in Dubray Books on Grafton Street, Dublin (one of those 'proper' bookshops). I needed a different nozzle to make proper rosettes but I think these swirls are quite pretty. I wanted the cake to resemble a tight bouquet of flowers. The heart design was made from a ring of marzipan moulded into a point at one end and two rounded points at the other.

It seemed a perfect theme for 'Rose' herself, feminine and pretty. Amaretto makes a beautiful scented cake, sweet and almond-y. Use almond essence either as the bottle of Amaretto is quite expensive.

The Irish Mammy is a hero to her offspring and pretty much a cultural icon. Even if she is not Irish there are several signs that your Mammy may indeed be an "Irish Mammy". Here are a choice few:

  1. She hates vulgarity and swearing 'for the sake of it' 
  2. She likes a nice glass of wine on a Friday night. 
  3. She drinks more tea than the country of India can supply. 
  4. She disagrees with 'airing your laundry in public', i.e. your personal business. 
  5. She spends hours on the phone talking to her sister/friend about the 'childer'. 
  6. She thinks meat and two veg is the meal of 'real men'. 
  7. She condenses her sentiments into numerous (readily repeated) clichés such as 'If there was work in the bed you'd lie on the floor!' or 'This isn't a hotel!' and 'You're lucky you didn't get pneumonia'.  
  8. She feeds her children like there is a famine approaching. 
  9. She thinks George Clooney is a 'decent looking man'. 
  10. She gets well narky when she misses an episode of certain soap(s).

For the Amaretto Victoria Sponge 
200g unsalted butter softened
200g caster sugar
200g plain flour sifted
1 tsp baking powder
1 1/2 tsp amaretto liqueur or almond extract
1 tbsp milk
4 large eggs at room temp.

I used 2 x 20cm round tins, with removable bottoms. The bottoms were greased with butter and lined with greaseproof paper and the sides brushed with melted butter.

Method:
1. Beat together the butter and sugar until pale- around 5 minutes with an electric mixer.
2. Add the eggs one at a time with 2 heaped tablespoons of flour to prevent the mixture curdling. Beat well after each addition- until there is no trace of egg yolk. Use up all the egg.
3. Add the amaretto liqueur and mix well.
4. Mix the flour and baking powder together in a dry bowl. Fold in the flour to the egg/butter/sugar mix or use the mixer on low speed until just combined. If the mixture is too thick, i.e. doesn't fall easily from a wooden spoon, add the milk and mix gently.
5. Bake at 190oC for 20-25 minutes, until risen and golden and a skewer/cocktail stick comes out clean.
6. Remove from the tins carefully and allow to cool fully.

For the frosting (you will need about four quantities of this for the filling and the rosettes)
75g butter, at room temperature and diced
200g icing sugar
1 tsp amaretto/almond liqueur
2 tbsp milk
100g marzipan

Method.
1. Beat together all the ingredients until the icing is pale- almost white.
2. Tint the marzipan with colour- this will take quite an amount of time, even with good quality gel food colouring (don't use liquid colouring, it will leave the marzipan too sloppy). When the colour is evenly distributed, roll the marzipan into a sausage. Mould into a point at one end and the two rounded parts of a heart at the other. To make the two rounded parts I cut a line through the sausage with a sharp knife then carefully teased the two sides out to make the heart shape.
3. Spread a thick layer of buttercream on the bottom layer then push the moulded ring  gently into the buttercream point side down, then spread more buttercream on top before the other layer is gently placed on top. If you have any questions about the technique do comment and I'll help you out!!
4. Roughly spread buttercream around the sides of the cake and on the top. It will look a mess, you'll see the cake through the buttercream but don't worry because the rosettes will cover it.
5. Use a star tipped nozzle to pipe rosettes. The Wilton 1M nozzle seems the most popular one although I can't find Wilton tips on sale in Ireland. Youtube has some neat videos such as this one Rose Cake Tutorial

Wednesday, 31 October 2012

Happy Halloween!!


Get creative with Halloween! This year I have to say I've been tame enough in my Halloween-y efforts. I didn't dress up (although I did go to a haunted Halloween experience and got sniffed at by a ghoul and pushed through the drawer of a zombie morgue- it was cool!). The internet has ruined Halloween for me. People buy these fancy costumes online that look too realistic. What happened to the days of cutting holes in bin bags (if you were a witch) or a sheet (if you were a ghost), using coat hangers in ways that would make Bear Grylls look unimaginative and safety-pinning the whole thing together with deft strategy? They were the good auld days. Our costumes were lame but we were all in it together, hoarding King crisps and sweating under one pound plastic masks.

PS note to the ladies. Lingerie is not an acceptable costume. Unless you are wearing your knickers over your trousers (Superman style) or bra over your top (Gwen Stefani in the 1990's style). Because in that case I have respect for your taste.

PPS cannot wait for the cheap Halloween sweets firesale tomorrow.


Sunday, 6 May 2012

Butterfly Cookies


Nothing spells summer like butterflies. One of my strongest memories of primary school is catching caterpillars and putting them in lid-holed jars, observing them turning them into chrysalis and then delightfully coming into school to have them fluttering at the windows on sunny mornings. I saw the first butterfly of the season last week and so I wanted to recreate them in cookies.

Spiced biscuits - From Gizzi's Kitchen Magic

250g butter softened
110g golden caster sugar
1 free range egg yolk
1/2 tsp ground ginger, cinnamon and mixed spice each
300g plain flour

Method:
1. Preheat the oven to 180oC. Beat the sugar and butter in a bowl with an electric beaters until creamy, about 5 minutes.
2. Crack the egg yolk in, add a heaped tablespoon of flour and beat until smooth and no traces of yellow yolk.
3. Sift the flour and mix until the dough comes together in a ball. Put in the mixture in the fridge in cling film for half an hour.

For the Royal Icing
500g icing sugar
2 medium egg whites
1 tsp lemon juice
1 tsp water.

Method:
1. Sift the icing sugar. Add the egg whites and lemon juice and beat together.
2. Beat for 4-5 minutes.
3. The icing will probably be very stiff. Add the water if you need and beat again until smooth and shiny.


Pipe the outline of the wings with a small nozzle. Allow to dry for a half an hour. Add water to the icing so that it is a little lighter then use a teaspoon to spoon into the wings and tease out with a cocktail stick.


Add details including the body and head. 


Friday, 28 October 2011

Halloween Chocolate Cola Cupcakes


The cupcakes are from Nigella Lawson's How to be a Domestic Goddess. I'm not going to win over any foodies by saying that I'm not a big fan of Nigella. That part at the end of every episode where she goes down to the 'larder' in her dressing gown and starts eating like she's in a Snoop Dog video is just too cheesy for my tastes. But I won't fault her on these cupcakes! The batter is very light (so much so I was sure I had added too much liquid) and this gives a lovely moist cupcake. The cola flavour is subtle, but a nice additional to the traditional chocolate cupcake. She makes a glaze but I didn't bother and just served with a traditional buttercream coloured black and my halloween decorations that I've been blogging about the last few days. Pretty cute I think!

For the cupcakes
125g unsalted butter
250g golden caster sugar
2tbsp cocoa
175ml coca cola
200g plain flour
1/4 tsp salt
1 tsp baking powder
1 egg lightly beaten
125ml buttermilk
1 tsp vanilla extract

Method:
1. Heat the butter gently until almost melted. Add the cocoa powder and cola and warm gently until all the butter is melted. Whisk quite rigorously until combined, the cocoa powder especially will take some whisking to incorporate.
2. Sieve the flour and baking powder into a large bowl and add the salt. Mix to combine.
3. In a jug mix the buttermilk, egg and vanilla extract together.
4. Add both sets of wet ingredients to the dry ingredients and mix until combined. Make sure all the flour is incorporated but don't overbeat.
5. Pour into cupcake cases and bake for 15 minutes at 190oC fan oven or until a skewer comes out clean.

Buttercream
40g butter softened
200g icing sugar sieved
1 tbsp coca cola
Blob of black food colouring

Method:
Beat all the ingredients together with an electric whisk until the icing is creamy and there are no lumps of butter (about 3-4 minutes, you really cannot overbeat). You may need to add a tbsp more of cola if there is still dry icing sugar inthe bowl but beat well before you make any additions. The icing may seem too dry but after beating it may be the right consistency.


Bones

Roll icing into two thin sausage shapes using a small glass (this gives nice flat edges where your hands won't). Using a cocktail stick push two incisions into the icing at either end to give that two ended bone shape. Using one finger roll the bone so it is thinner in the centre.

Zombie hands

Shaun of the Dead is a great movie, the best of silly British comedy. These decorations are zombies crawling out of the ground (if you use your imagination!) Colour a weird green for that extra effect.

Dip one end of a cocktail stick in green food colouring (I just used the cheap liquid variety). Rub the end of the cocktail stick in a ball of white ready roll icing and knead until the colour is fairly evenly distributed.


Roll into small balls on a piece of clingfilm and flatten into discs. Cut fingers out with a sharp knife, placing the disc flat on the clingfilm. Remember to leave a gap between the thumb and the next finger. Round the fingers out fingers by squeezing them gently.

Cut a piece of a drinking straw about 2cm long. Push 1cm into the zombie hand very gently leaving 1cm out for pushing into the cupcake so the hand 'stands up'.

Thursday, 27 October 2011

Mask from the Movie Scream/Skeleton

Roll the icing into white balls. Flatten the balls with your thumb into thick discs. Squeez the bottom the disc gently to give the 'chin'. Use a cocktail stick to carve out empty eyeball sockets, two small lines for the nose and a horizontal line for the mouth.


Easy Halloween Decorations -The bloody eyeball!

I have hazy childhood memories of Halloween, it was never really a big event. We bought pound-shop gaudy masks and cut eye holes out of black plastic bags and white sheets. There was no fancy dress shops or elaborate costumes. I remember one year going around the village with my best friend. We went into the pubs (it was more innocent times) and were rewarded with a bag of King crisps each  (you may need to be Irish to get this reference- they are the best cheese and onion crisps ever!).

In the in-between years dressing up was unfashionable and childish and it wasn't really until last year when Mr Mushroom Hater had a fancy dress 21st party that I embraced the holiday. Over the next few days I hope to put up some ideas up for using ready roll icing to create easy cupcake decorations.

The Bloody Eye Ball 

1. Dye a small ball of icing green or blue. Dye a very small ball of icing black.

2. Roll a ball of white ready to roll icing and flatten under about 1cm thick. Roll the blue or green icing into smaller balls and squash on top of the white discs. Finally squash the small black balls onto the discs for pupils.

3. Using a cocktail stick dip the stick into the colour and drag across the white disc to make bloody eyeballs.


Saturday, 24 September 2011

Sugar Paste Flowers


I would consider myself quite a tomboy and not prone to 'girly' sentimentality but I cannot but swoon at anything remotely wedding-cake-like and these flowers fit the romantic bill. They add a touch of professional baker to any cake - they look so intricate and delicate. In fact they are quite easy to make if a bit fiddly. I tried to tackle them after my aqua aerobics on Thursday evening. I think the family were a little worried about my sanity as I almost fell asleep into a puddle of red food colouring but they do need two days to dry out so I had no time to lose!

1. Tint a small ball of ready-to-roll icing. It is easier to work with in smaller portions. To tint, use a cocktail stick to add strands of colour to the ready to roll icing in small portions. Add the colour slowly until you reach the desired colour. Knead the icing well after every addition to evenly distribute the icing. If the icing gets too sticky knead in some cornflour.

2. Roll out a sheet of clingfilm and pull off little balls of the icing and place on the film. Put another layer of clingfilm over the first and using your thumb, squash the balls until petal shape and quite thin.

3. Rub the first petal into a curl to make the centre of the rose. Gently mould the petal shapes around that centre curl, adding the outer layers slowly until you are happy with the size of the rose.

4. Allow to dry for 2 days until hard.