Showing posts with label birthday cake. Show all posts

Monday, 19 January 2015

Salted Caramel Pretzel Chocolate Doughnuts


Listening to: Serial- A journalist becomes obsessed (in her own words) with the murder of a teenage girl in Baltimore in 1999. Her ex boyfriend has been convicted of her murder but has maintained his innocence since his imprisonment at 17. Thorough research and excellent journalism results in an utterly intriguing podcast series detailing her investigation. I have never really gotten into podcasts, but Serial demonstrates how effective they can be when done properly. While baking, on the way to work, cleaning the house, chilling out with a cup of coffee. I'm hooked on Serial!

Raving about: The Walworth Farce at the Olympia theatre - I don't go to the theatre enough. So compelling, so intense, dark and bitter and sweet and funny. Brilliantly executed with thrilling performances from the Gleeson family. What are we if not our stories? I think all the weekend shows are sold out but if you are around Dublin and free on a week day definitely go. If you don't believe me listen to what Aaron Paul had to say when he saw it this week.
    
Reading: We Are All Completely Beside Ourselves - Don't read too many reviews of this, all you need to know is that this a story about family, laced with humour, deft observations and interesting nougats of psychology. Short listed for the Man Booker prize, this is one of my favourite books in a long time. 

Eating: Baked Doughnuts! I am a foodie fad follower and when baked doughnuts started cropping up on my favourite blogs I knew I had to get a baked doughnut pan. They don't cost very much but you will need to go to a specialist kitchen shop. The possibilities are endless, but where better to start then chocolate and salted caramel frosting! The crushed pretzels add a salted crunch. In truth, they aren't much different than cupcakes but they are so much more fun! 


Makes 10 

Adapted from Joy the Baker
1 cup plain flour
1/4 cup cocoa powder
1/2 tsp baking powder
1/4 tsp finely ground coffee powder (or melt instant granules in a tiny splash of water)
1/4 tsp ground cinnamon
25g milk chocolate, melted
1/4 tsp salt
1/2 cup buttermilk
1 egg, slightly beaten
50g butter

For the frosting
1/2 cup caster sugar
1/2 cup cream
25g butter
1 tsp coarse salt
1 cup pretzels, crushed
1 cup icing sugar, sieved
3 tablespoons cream

1. Sieve the flour, cocoa powder, baking powder, coffee and cinnamon into a big bowl. Add the salt.
2. Heat the butter over a low heat until melted. Continue to heat until the butter begins to crackle and brown. Take off and allow to heat.
3. Spray the doughnut pan with cooking spray or brush with melted butter. Put in the fridge to cool completely.
4. Add the butter, egg and melted chocolate and mix well until completely combined.
5. Heat the oven to 180oC. Only fill the doughnut pan 3/4 full and bake for 12-15 minutes until a toothpick comes out clean.
6. Make the frosting. Heat half of the sugar over a low-medium heat watching cautiously. When the sugar has melted sprinkle over the rest in an even layer and allow to melt. Heat for 4-6 minutes until the sugar is copper coloured. Don't allow to get too dark.
7. Add the 1/2 cup cream into the caramel. The mixture might become lumpy, but keep whisking over a low heat until it becomes smooth again.
8. Add the butter and salt and whisk until melted and glossy. Pour into a bowl and allow to cool completely. If there are any lumps, sieve them out.
9. Beat the icing sugar, cream and 3 tablespoons of the salted caramel with an electric whisk until smooth.
10. Crush the pretzels. Spread the doughnuts with the frosting and sprinkle over the pretzels.

Monday, 26 May 2014

Cinna-bun Tear 'n' Share


Well it has been an extremely exciting week for Ireland. First Miley came to Dublin, twerked all over the shop, outraged the Irish mammies and daddies who obviously lived under a rock before they bought the tickets and went for dinner in a place I found months ago. (FYI The bill comes with a brown paper bag of jellies and the menu is stuck into the pages of old books- check out Mulligans in Stoneybatter).

Then One Direction invaded played Croke Park three days in a row and we re-found in our hearts the great Statesman that is Niall Horan. Personally I had all of the 1D hysteria I could cope with when I watched that 'Crazy for One Direction' Channel 4 documentary and on that occasion I greatly valued the volume function on my remote.

Then in a most bizarre turn of events Kimye turned up in Cork for their honeymoon with/without their compass-inspired child. Local messers took to social media to con poor gossip-seeking journalists-see this news report. I giggled out loud walking home from work visualising Kim K supposedly going through the 39c veg in Alid. Two joggers gave me raised eyebrow looks (but judgement from joggers is a whole other story).

In the middle of all this we also had local and European elections but to be honest no one gave a monkeys.

My part in all of the craziness was one of amused bystander. All that web browsing naturally led to multiple cups of tea and cups of tea led of course to the search for a satisfying accompaniment.

Enter Cinna-bun.

I was previously unaware of the cinnabun phenomenon in the US. Unfortunately it hasn't really caught on here which is a ridiculous shame because there is nothing more satisfying than a cup of tea with the pillow-soft sweet dough and cinnamon sugar swirls of a cinnamon bun. Get artsy-fartsy with some buttermilk glaze and you turn phenomenal into pheNOMenal. 

The use of buttermilk here sounds crazy I know but the tang of the buttermilk compliments the sometimes sickly-sweet icing sugar. Plus it looks pretty. And that is never far from my mind. 


The cardamon adds a lovely fragrance to the dough but leave it out if you want to play it safe.

I use strong white flour as it makes the dough rise faster and I think adds good structure to the dough.

Recipe from Donal Skehan, makes 1 tear and share loaf with 10-12 big pieces
For the dough
200ml milk
55g butter
7g sachet of fast action yeast
55g caster sugar
1 tsp ground cardamon (optional)
375g strong white flour
1/4tsp salt

For the filling 
55g butter softened
1 tbsp cinnamon
45g caster sugar

For the glaze 
125g icing sugar
1-2 tablespoons of buttermilk

1. Melt the butter over a low heat in a small saucepan or in the microwave. Add the milk and heat until lukewarm.
2. Take off the heat, add the yeast and stir well. Leave to sit for 5 minutes.
3. In a clean bowl mix the flour, caster sugar, cardamon and salt together.
4. Add the wet ingredients and mix until you have a shaggy dough.
5. Bring together with your hands and turn out on a floured surface. Knead for 5-6 minutes until the dough is smooth and pliable and springs back when you stick your finger into it.
See the transformation below. The first photo is pre-kneading and the second is post kneading.


6. Put the dough in a dry bowl and cover with a tea towel or with clingfilm. Leave to rise for about an hour in a warm place until doubled in size.
7. Take out the dough and roll on a floured workspace until about 3mm thick. Leave to rest for 5 minutes.
8. In the meantime make the filling by beating all the ingredients together.
9. Spread the filling on the rectangle leaving a 1 cm border all the way around.
10. Roll on the long side, keeping it as tight as you can. Leave the joining piece at the bottom and transfer to a baking tray lined with baking paper. Brush with beaten egg for extra shine.
11. Cut the log at angles with a sharp knife or kitchen scissors without cutting right through to the bottom making 12 pieces. Tease out the pieces so that they are removed slightly from the centre as per the pictures.
12. Allow to rest for 20 minutes to puff up slightly and then bake at 190oC for 20-25 minutes turning after 15 minutes until golden brown on top. Take out of the oven and leave to cool.
13. Make the buttermilk glaze by whisking all the ingredients together until there are no icing sugar lumps. The amount of buttermilk you need will depend on how thick your buttermilk is. Add one tablespoon, beat well and then add more.
14. Drizzle generously over the cooled cinna-bun.


Saturday, 3 November 2012

Amaretto Rosette Cake with Marzipan Heart and Irish Mammys


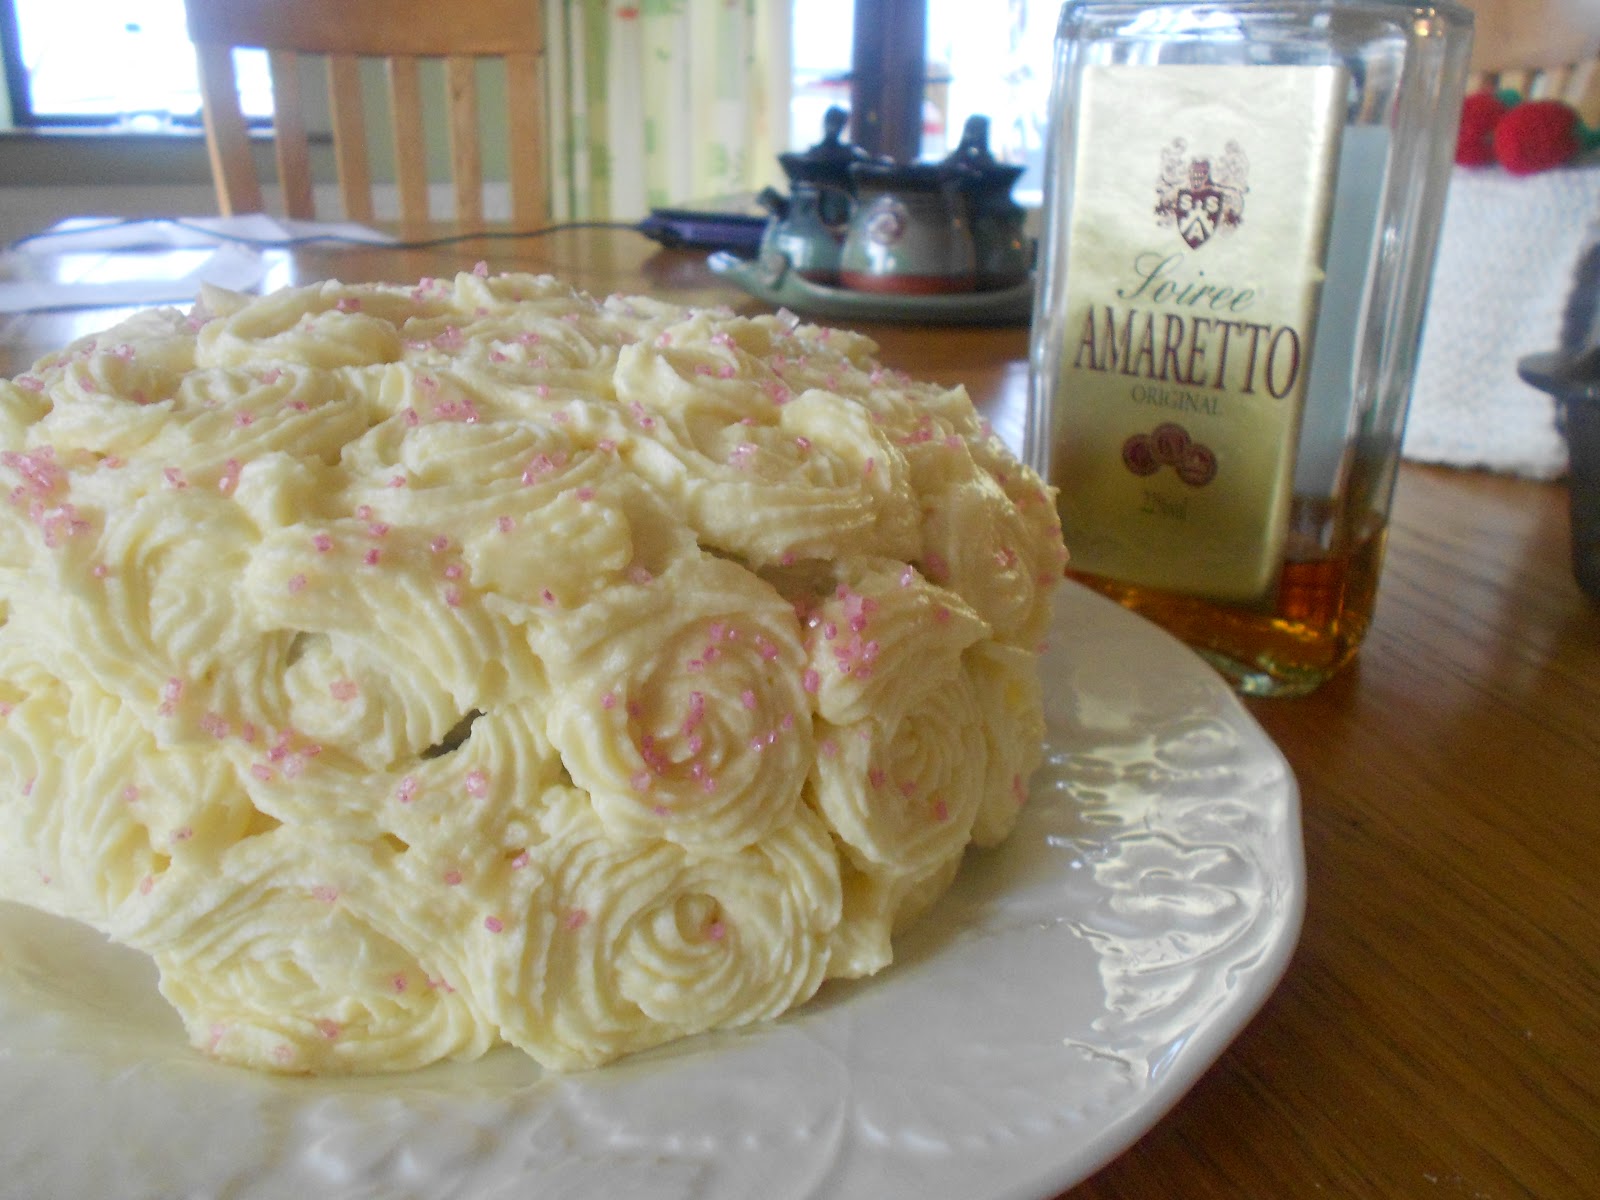
I wanted it to look like a wedding bouquet 


With a suprise heart inside 


Happy Birthday Mammy!! This was a design I've been wanting to try out ever since I flicked through the new Great British Bake Off Book in Dubray Books on Grafton Street, Dublin (one of those 'proper' bookshops). I needed a different nozzle to make proper rosettes but I think these swirls are quite pretty. I wanted the cake to resemble a tight bouquet of flowers. The heart design was made from a ring of marzipan moulded into a point at one end and two rounded points at the other.

It seemed a perfect theme for 'Rose' herself, feminine and pretty. Amaretto makes a beautiful scented cake, sweet and almond-y. Use almond essence either as the bottle of Amaretto is quite expensive.

The Irish Mammy is a hero to her offspring and pretty much a cultural icon. Even if she is not Irish there are several signs that your Mammy may indeed be an "Irish Mammy". Here are a choice few:

  1. She hates vulgarity and swearing 'for the sake of it' 
  2. She likes a nice glass of wine on a Friday night. 
  3. She drinks more tea than the country of India can supply. 
  4. She disagrees with 'airing your laundry in public', i.e. your personal business. 
  5. She spends hours on the phone talking to her sister/friend about the 'childer'. 
  6. She thinks meat and two veg is the meal of 'real men'. 
  7. She condenses her sentiments into numerous (readily repeated) clichés such as 'If there was work in the bed you'd lie on the floor!' or 'This isn't a hotel!' and 'You're lucky you didn't get pneumonia'.  
  8. She feeds her children like there is a famine approaching. 
  9. She thinks George Clooney is a 'decent looking man'. 
  10. She gets well narky when she misses an episode of certain soap(s).

For the Amaretto Victoria Sponge 
200g unsalted butter softened
200g caster sugar
200g plain flour sifted
1 tsp baking powder
1 1/2 tsp amaretto liqueur or almond extract
1 tbsp milk
4 large eggs at room temp.

I used 2 x 20cm round tins, with removable bottoms. The bottoms were greased with butter and lined with greaseproof paper and the sides brushed with melted butter.

Method:
1. Beat together the butter and sugar until pale- around 5 minutes with an electric mixer.
2. Add the eggs one at a time with 2 heaped tablespoons of flour to prevent the mixture curdling. Beat well after each addition- until there is no trace of egg yolk. Use up all the egg.
3. Add the amaretto liqueur and mix well.
4. Mix the flour and baking powder together in a dry bowl. Fold in the flour to the egg/butter/sugar mix or use the mixer on low speed until just combined. If the mixture is too thick, i.e. doesn't fall easily from a wooden spoon, add the milk and mix gently.
5. Bake at 190oC for 20-25 minutes, until risen and golden and a skewer/cocktail stick comes out clean.
6. Remove from the tins carefully and allow to cool fully.

For the frosting (you will need about four quantities of this for the filling and the rosettes)
75g butter, at room temperature and diced
200g icing sugar
1 tsp amaretto/almond liqueur
2 tbsp milk
100g marzipan

Method.
1. Beat together all the ingredients until the icing is pale- almost white.
2. Tint the marzipan with colour- this will take quite an amount of time, even with good quality gel food colouring (don't use liquid colouring, it will leave the marzipan too sloppy). When the colour is evenly distributed, roll the marzipan into a sausage. Mould into a point at one end and the two rounded parts of a heart at the other. To make the two rounded parts I cut a line through the sausage with a sharp knife then carefully teased the two sides out to make the heart shape.
3. Spread a thick layer of buttercream on the bottom layer then push the moulded ring  gently into the buttercream point side down, then spread more buttercream on top before the other layer is gently placed on top. If you have any questions about the technique do comment and I'll help you out!!
4. Roughly spread buttercream around the sides of the cake and on the top. It will look a mess, you'll see the cake through the buttercream but don't worry because the rosettes will cover it.
5. Use a star tipped nozzle to pipe rosettes. The Wilton 1M nozzle seems the most popular one although I can't find Wilton tips on sale in Ireland. Youtube has some neat videos such as this one Rose Cake Tutorial. 

Tuesday, 16 October 2012

Earl Grey Sponge with Lemon Curd and Earl Grey Honeycomb


I love honeycomb. It reminds me of fairs and jamborees as a child where those sweet sellers would come in their vans and  flog candy floss and fudge and other jaw-cementing goodies. I always got a bag of honeycomb. There was something... mysterious about it, alien almost. To me it looked like a piece of the moon, hard and brittle but in oddly deformed chunks with those signature bubbles running through it like the stream of the galaxy. It's a little less enigmatic when you make it yourself but it is so much fun having it fizz and foam when you add the bicarbonate. I added earl grey tea for a more adult flavour and used it here to add some gold colour to this birthday cake, you could leave it in big chunks and eat as is. Probably best not to mention it to your dentist next appointment though! 

For the Sponge 
220g unsalted butter softened 
220g caster sugar 
220g plain flour 
1 generous tsp baking powder 
3 eggs 
225ml milk 
8 earl grey tea bags 

1. Bring the milk to the boil in a saucepan. Throw in the teabags, slosh around a bit and leave to soak for half an hour off the heat. 
2. Beat the butter and sugar together until very pale- about 5 minutes. 
3. Sift the flour and baking powder together in a dry bowl. 
4. Break up the eggs with a fork in a cup. Add the egg one quarter at a time with a big heaped spoon of flour until all the egg is gone. Beat well after each addition. 
5. Squeez out the teabags and throw away. Fold in the remaining flour with a good slosh of milk and fold gently after each addition until all the milk and flour are gone. The mixture will be brown. 
6. Line 2 8 inch baking tins. I split the mixture into 3 thin layers and baked for around 12-15 minutes at 180oC until a skewer inserted into the cakes comes out clean. If you bake 2 layers baking time will be a little more. Always use a skewer and you won't go far wrong. 

For the frosting (enough to sandwich three layers, you'll need extra for piping and for the top if you wish to decorate it)
75g butter softed
200g icing sugar 
2-3 tbsp milk 

1. Beat all the ingredients together until pale with no lumps- around 4 minutes. 

For the honeycomb 
100g caster sugar 
1/2 tbsp glucose 
25ml runny honey 
1/2 tsp baking powder 

1. Put the sugar, honey, glucose and a little less than 2 tbsp of water in a pan and boil until the liquid reaches 150oC. You really need a thermometer for this, its tricky work. The liquid should be a light caramel. Remove from the heat and quickly add the bicarbonate of soda. The mixture will fizz like crazy, keep whisking it then pour onto a lined baking sheet and allow to cool for about an hour. 

To assemble 
1. Beat the honeycomb between two sheets of greaseproof paper until fine gold crumbs. Tear an earl grey teabag and mix half of the leaves through the honeycomb. 
Allow the cakes to cool on a wire rack. Spread a heaped tablespoon of lemon curd on each and smooth thinly and then spread one third of the frosting. Scatter a handful of the honeycomb dust. Repeat with the other layer. Smooth a thin layer on top and finish with honeycomb dust. 

Wednesday, 2 November 2011

After Eight Cake

Birthdays on weekdays are STUPID! I like to spend a whole day messing around perfecting a cake, trying out weird ideas but I can't do that if I have to work most of the day. And day-before birthday cake just isn't the same... So this was a thrown together birthday cake for my mother who turned a mystery age today. She is not a fan of the over indulgent- sweet cake and the 'After Eight' idea is something I've been wanting to try out for ages on cupcakes. Peppermint and dark chocolate is a great sophisticated 'adult' combination. The chocolate cake here is lovely. The almonds add richness and keeps the cake moist.


For the chocolate cake
225g butter
250g caster sugar
4 eggs
2 tbsp milk
1 tsp almond essence
50g ground almonds
100g self raising flour
1 tsp baking powder
50 g cocoa powder

Cream the butter and sugar until pale and fluffy. Beat the eggs with the milk and almond essence lightly in a cup. Add a quarter of the egg mix at a time with a tsbp of flour. Finally fold in the rest of the dry ingredients. Bake for 25-30 minutes at 180oC.

For the buttercream
75g butter
200g icing sugar
2 tbsp milk
2-3 drops of peppermint essence

Cream all the ingredients together until smooth and white with an electric hand held beater.
The decoration is fairly self evident from the pictures above. I just smoothed the buttercream on top and used the after eights to spell out Happy Birthday.

Friday, 21 October 2011

Ice cream cake

Some children never grow up. I'm not talking Peter Pan here but the boy in my life who, without fail, will order ice cream for dessert every time we go out for a meal. And don't even mention sharing or you'll get shot down faster than a fighter pilot. I used to be very unimpressed by this practice and even fairly incredulous. I mean ice cream is nice and all, great on a hot day but its no sticky toffee pudding, lemon meringue pie or Bailey's cheesecake (to name but a few of the 'greats'). I have however, learned to love this idiosyncrasy and find it quite funny. So when Mr Mushroom-Hater's birthday drew near I decided to make him an ice cream cake. Its something I haven't done before and wasn't quite sure how it would work. My biggest worry was that a hacksaw would be needed to cut the frozen cake and then it would taste like a lump of ice but actually the cake froze really well, as did the pavalova with was really mallowy and soft.

This cake is so adaptable. Buy different flavours of ice-cream, make your own, chop up your favourite chocolate bar (e.g. dime, crunchie) and fold into the ice cream. I didn't have much time to decorate, this week has been hectic for loads of reasons but I think the taste made up what was lacking visually!


For the cake
175g butter, softened
175g caster sugar
3 eggs lightly beaten
170g self raising flour sifted
1 tsp baking powder
4 tbsp cocoa powder
25g chocolate melted

For meringue 
3 egg whites
175g caster sugar

1. Make the cake in the normal way, cream the sugar and butter until pale and light. Lightly beat the eggs together then add alternatively with a few tbsp of flour/baking powder/cocoa powder. Fold in the remaining flour with the melted chocolate.
2. Before you grease the tin, mark out two circles using the tins bottoms as templates. Pour into the greased 20cm cake tin. Beat for 20-25 minutes until a skewer comes out clean. Leave the cake to cool and then cut into two lengthways to make two thinner cakes.
3. To make the meringue tip the sugar into a small roasting tin and warm in a preheated oven for about 5 minutes. Turn the oven down to 110oC.
4. Whisk the eggs with an electric mixer until frothy. Tip all the hot sugar in in one go and continue to beat on high for about 8 minutes until the meringue is cold, very stiff and you can turn the bowl upside down without the meringue coming out.
5. Put the meringue onto the two circles and spread to just before the pencil lines.
6. Bake for 1.25 hours in the oven. Leave the door ajar and turn off the oven. Leave until completely cold. This may take a few hours.

To assemble
1 litre vanilla ice cream
1.5 litres chocolate ice-cream

Start with a cake layer, spread with the vanilla ice-cream. Top with a layer of the meringue. Very carefully spread chocolate ice cream on top making sure not to crack the pavalova. Top with another pavalova, another layer of vanilla and then the final cake layer. Spread the chocolate ice cream on the top of the cake and over the sides if desired. Decorate as desired.

Sunday, 9 October 2011

Twilight Cake


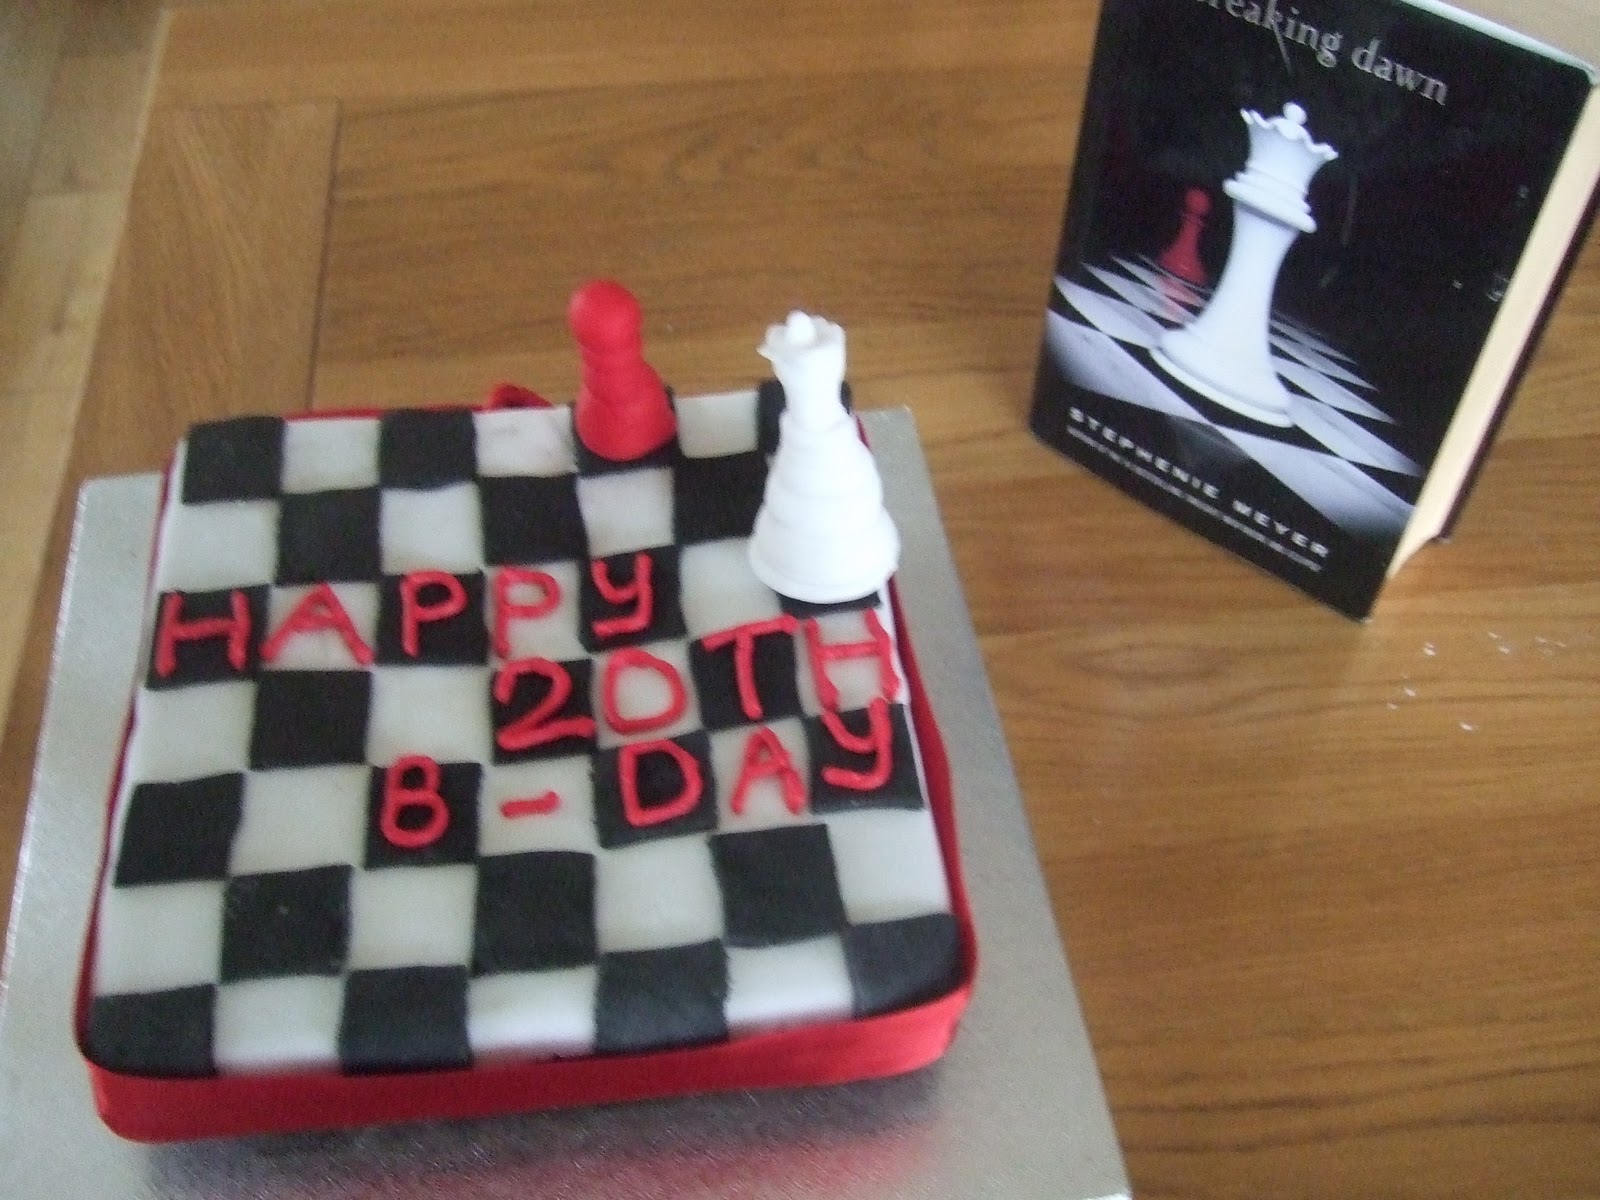
Twihards are surely itchy to correct the title of this cake having seen the pictures. I may be calling this a 'Twilight' Cake but I do know that it is in fact based on the 'Breaking Dawn' book cover, the final installment of the series. I wanted to do something special for my little sister's birthday and after tossing plenty of ideas around I settled on a Twilight theme - she is literally obsessed with the books and movies- but didn't know how to represent it on a cake. As fun as it sounded to try to sculpt Robert Pattinson out of ready roll icing I considered it a little beyond my capabilities (Let's face it, only God's hands could do justice to that work of art). You can buy cake decorations with characters from the movies on them, but you know what, I think cakes are like Halloween costumes, they are so much better when they are homemade with a bit of thought and humour than some generic outfit you can buy in a joke shop or on the internet. So I went with the book cover which seemed really do-able and more true to the story of the book. In researching this cake I learned that the pawn and queen chess pieces are a metaphor for Bella's progression in the series, moving from being a weak character to finally being the strongest, 'the queen'. I can almost feel the eyes rolling as I mention 'researching' the cake!

For the Devil's Food Cake

4 tbsp cocoa powder
175ml boiling water
1 tsp bicarbonate of soda
100g dark chocolate
125g unsalted butter, softened
350g caster sugar
2 large free range eggs
1 tsp vanilla extract
300g plain flour
125ml soured cream

For the Buttercream
200g butter
75g butter, softened and diced
1 tbsp milk

Preheat the oven to 180o C. Put the cocoa into a heatproof bowl and mix to a smooth liquid with the boiling water. Stir in the bicarbonate of soda and leave to cool.

Break up the chocolate into another heatproof bowl and either melt over a pan of steaming water or, if you're lazy like me, in the microwave 20 seconds at a time, stirring all the time.

Beat the butter and sugar for 4-5 minutes until very light. There is quite a lot of sugar in proportion to the butter so give it a good beating to break it down. Beat the eggs and vanilla with a fork until broken up, then add to the butter mixture a tbsp at a time, beating well after each addition.

Sift the flour, then fold in in 3 batches, alternatively with the soured cream. Mix the cocoa liquid into the melted chocolate, then fold into the cake mixture. When thoroughly combined- no streaks visible- divide the mixture between 2 x 20.5cm sandwich tins, greased and lined with baking paper.

The book says to bake for 30 minutes until risen and just firm and a skewer inserted into the cake comes out clean, but I needed to bake for about 50 minutes. It could be my oven so bake for 30 minutes and test, but be aware that the cake may need more baking.

Run a bladed knife around the inside of the tins to loosen the sponges and turn out on a wire rack and cool. When cold slice horizontally. Make up some buttercream (I tinted it red) by creaming the icing sugar, butter and milk. Sandwich the cakes together with the buttercream.

To decorate mould the queen and chess pieces out of ready roll icing having tinted red and white respectively.

The chessboard takes a bit of planning. Measure the face of the cake and divide into equal squares, you may need to leave a border either side. My cake face was 23cm so I left a 1cm border each side and then split the 21cm into 7 x 3cm squares. Melt 5 tbsp of apricot jam and brush the cake with it. This will help the icing to stick to the cake.  Cover the cake with white ready roll icing rolled out quite thinly. Measure the cake face and allow for icing to drape over the side. I tied a ribbon around the edge of the cake so I didn't need the icing to totally cover the sides- a neat cheater's trick! Smooth over with your fingers to smooth out bubbles.

Cut out the black squares according to your calculations- mine were 3cm squared. Use a ruler to set the squares on the cake, leaving gaps for the quite checkerboard squares. I didn't need to stick the squares down, I found they stuck themselves. Arrange the queen and pawn and tie the red ribbon around the cake.

Saturday, 24 September 2011

Sugar Paste Flowers


I would consider myself quite a tomboy and not prone to 'girly' sentimentality but I cannot but swoon at anything remotely wedding-cake-like and these flowers fit the romantic bill. They add a touch of professional baker to any cake - they look so intricate and delicate. In fact they are quite easy to make if a bit fiddly. I tried to tackle them after my aqua aerobics on Thursday evening. I think the family were a little worried about my sanity as I almost fell asleep into a puddle of red food colouring but they do need two days to dry out so I had no time to lose!

1. Tint a small ball of ready-to-roll icing. It is easier to work with in smaller portions. To tint, use a cocktail stick to add strands of colour to the ready to roll icing in small portions. Add the colour slowly until you reach the desired colour. Knead the icing well after every addition to evenly distribute the icing. If the icing gets too sticky knead in some cornflour.

2. Roll out a sheet of clingfilm and pull off little balls of the icing and place on the film. Put another layer of clingfilm over the first and using your thumb, squash the balls until petal shape and quite thin.

3. Rub the first petal into a curl to make the centre of the rose. Gently mould the petal shapes around that centre curl, adding the outer layers slowly until you are happy with the size of the rose.

4. Allow to dry for 2 days until hard.