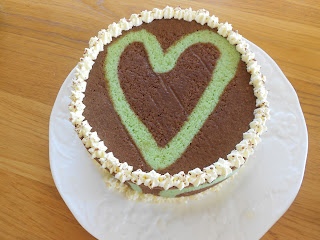
I love the Springtime, when the first glints of Summer pierce the endless cold and darkness of Winter. Evenings are my favourite time of the day, after 5-ish. On a Springtime Sunday the hustle and bustle of getting the big dinner is over and the house sighs with relief. Give me a cup of tea, a slice of cake and I'll curl up in the best armchair in the house like a old fat cat. This cake is really something special and I have to say I'm chuffed with the way it turned out. Its not as hard as it perhaps appears when you read the instructions. The sponge is actually quite flexible and so it is easy to manipulate it into the tin. The recipe I used told you to bake two big sheets of sponge and cut the circles top and bottom from it. Instead I just used the sponge tin to cook the circles- I thought that it would leave less waste and avoid that messy cutting out business. I then baked the rest on the mix in a rectangle tin and trimmed them to be the sides of my cake.
Adapted from the Great British Bake Off book
For the paste
100g unsalted butter softened
100g icing sugar softened
3 egg whites at room temperature
100g plain flour
green food colouring
For the sponge
4 large egg whites plus 4 whole eggs at room temperature
15g caster sugar
150g ground almonds
150g icing sugar
25g plain flour
55g unsalted butter melted and cooled slightly.
For the mousse
175g plain chocolate
2 sheets of leaf gelatine or 1 tsp powdered gelatine prepared according to packet instructions
2 large eggs separated
1/2 tsp peppermint essence
300ml double cream whipped.
2 x loose bottomed (preferably springclip tins) 18cm
1 x rectangular tin 20 x 23cm
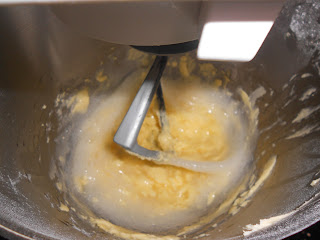
1. First for the paste. Beat the butter and sugar together until light and fluffy. Gradually whisk in the egg whites and continue whisking for 2 minutes. The mixture will look a bit suspect. Like this:
Yes it looks like a mess but reserve judgement. When you fold in the flour the mixture should come back together again. Using the tip of a knife add the colouring and fold in.
2. Pipe the paste into lined tins in swirls/patterns. I used two 18cm round cake tins and one rectangular tin, 30cm x 23cm.
 |
| The rectangular tin which will make up the sides of the cake |
3. Leave the tins in the freezer for about 1-2 hours. This is important and cannot be skipped or else when you put your chocolate sponge mix on top the green paste will bleed into the sponge and you will lose your lovely design.
4. Now to make your chocolate sponge. Beat the egg whites in a separate, clean glass bowl with the caster sugar until dry and stiff. They will not be as shiny as proper meringue as there isn't enough sugar but they should hold the trail of the beaters and form peaks.
5. In another large bowl beat almonds, icing sugar and whole eggs for about 3 minutes until light, thick and increased in volume. Sift the flour and cocoa on top and then fold in. Finally fold in the melted butter.
6. Pour over the tins and ease the mix around your designs. I tilted the tins to get the mix to fall itself. The layers should be thin, about 1 inch thick.
7. Bake in a preheated oven for 7-9mins @ 200oC until springy to the touch and golden.
8. Turn out carefully on sheets of greaseproof laid over a cooling rack. Definitely don't skip this step, the sponge is quite sticky and will stick to your wire rack and make it impossible to get off without breaking it.
9. Place one of your circles, pattern side out on the bottom of the cake tin you cooked it in. I lined the cake tin with cling film to make it easier to invert before I served. Cut the rectangle piece in half lengthways so you have two long pieces. Measure the circumference of the tin with a piece of string and trim the two pieces so together they are the circumference of the tin with about 1 inch/2cm extra.
10. Carefully lift one of the pieces are press it gently into the curve of the tin. The other piece should be about 1 inch/2 cm too long. Lift your longer pieces and press it into the curve tucking the long end in tight to the other piece of sponge so that this pressure holds the sponge together.
11. Now for the mousse. Melt the chocolate gently in the microwave. Add the egg yolks and peppermint essence and mix until combined.
12. If using leaf gelatine, soak the leaves according to packet instructions and then pop in the microwave for 10-20 seconds until fully dissolved. If you have lumps in the gelatine these will be nasty in the mousse. If using powder melt carefully according to the packet instructions. Allow to cool before folding into the mousse. Fold in the whipped cream.
13. Beat the egg whites like you did with the sponge mix although they won't be quite so stiff. Fold into the chocolate mixture.
14. Pour the mousse into the cake lined hollow you have made. Trim the side pieces so that the mousse is about 2cm from the top of the pieces. Press your top circle patterned side out on top.
15. Leave overnight to chill.
16. Run a knife around the edge of the cake and using the loose bottom push the cake up out of the tin. If you have a springclip tin you just need to open the clasp gently.
17. Decorate with piped whipped cream and crumbled chocolate flake/grated chocolate.
 |
| Ta to the Dah if I may say so myself |


I have that book , watched the series but still too scared to try it ...
ReplyDeleteWell done, this looks so fab!
The part where you take the tin away at the end is so nerve-wracking incase it just all crumbles! But it didn't - you should give it a go!!
ReplyDeleteWow that looks amazing!
ReplyDelete