I have gone off sugarcraft recently. I think that the styling techniques of the likes of Donna Hay (thanks Zita!), sprinklebakes.com or Lily Vanilli provide a more more spectacular way of decorating cakes. They use natural ingredients, flowers and petals or chocolate to imaginatively give a modern twist to cake decorating. I also admire the fact that this type of decoration can add to taste and texture as well reflecting the flavours within.
All this being said, recently I was asked to decorate a Christening cake and I do think when it comes to childrens' cakes sugarcraft is probably the way to go. Fun, colourful and cute was the theme. Sometimes when you search the web or look at a sugarcraft book it seems that you need to spend a heck of a lot on paraphernalia- ball tools, glue, cutters, gum paste and I neither had the money or time to go to Dublin to buy that stuff. This teddy requires only fondant (the regular supermarket kind) and a little food colouring. And a lot of patience and trickery!
Things to remember about teddy anatomy:
1. His head is oval
2. His ears are small compared to his head- otherwise he will look like a pig.
3. His "feet" are disproportionately big compared to the rest of his body. The paws are big and round and come out from his body, something which I missed out on this time, I made the feet too small.
4. His arms come out from just below his head.
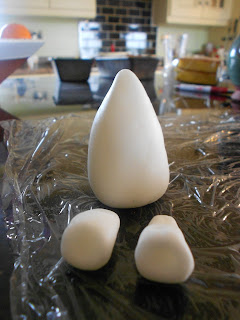
1. For the body mould a tear shaped ball of fondant. For the feet mould two pieces of fondant into small tear shapes. On the small end flatten them out slighly so that they will sit under his body. On the big end of the tear shape make small indents for his paw using your finger or a ball tool if you have it.
2. For the arms make two long sausages that get slightly narrower towards the end.
3. For the head make a big oval ball. Make two very small tear shaped drops for ears and a flat circle for his mouth/snout. Stick the flat circle to the bottom of the oval shape with some water and slight pressure. Make two small holes near the back of his head for the ears with a cocktail stick. Put some water on the bottom of the small ear teardrops and put them inside the small holes, moulding together any gaps. Flatten the ears out into small ovals.
4. To assemble wet the feet pieces that are slightly flattening and put the oval body pieces on top of them pressing slightly so that they stick on. Get a piece of spaghetti long enough to go through half of the teddy's body and position it in the centre of the tear drop. Allow about one centimetre of spaghetti coming out of the body because that is where you will stick on the head.
5. At this stage take a sharp knife and cut one cm off the top off the teardrop around the spaghetti. This will ensure that Teddy does not have a neck- another lesson in Teddy anatomy!
6. Carefully put your head piece on top of the spaghetti.
7. Attach the arms by brushing water on the inside of the arms and pressing them gently on to the body.
8. Now add any detail you like! Make little pink circle for the 'flesh' inside his ears and paws and attach with water. Make two black balls for his eyes and a larger one for his nose.
9. My bear is holding a heart, add any decoration you wish!
 |
| The finished product |


I’ve read some good stuff here. Definitely worth bookmarking for revisiting. I surprise how much effort you put to create such a great informative website.teddy bears
ReplyDeleteI am hoping the same best effort from you in the future as well. In fact your creative writing skills has inspired me. Are you ready for the new game sims 4 cheats update! new cas items, configurable stairs and more.
ReplyDelete