Monday 30 April 2012

Bakewell Cherry Cupcakes


I love experimenting. In fact apart from a few old favourites I like to make new things most times when I bake. That is part of the fun of it for me. Yes there have been dire inedible failures but they are forgotten when you find a new recipe or tweak an old one and it is just perfect. Bakewell tarts are so classic they deserved to be spoiled by making them time and time again. The frangipane almond sponge is so moist, the shortcrust pastry crumbly and the jam so.... well jammy! Top the bun off with some quick glace icing and a glace cherry, then pull out that china you never use because it isn't dishwasher safe and have yourself a vintage tea party!

For the sweet pastry
75g margarine,
75g flour 
pinch salt 
25g icing sugar 
2 tbsp water

For the Filling (From Great British Bake Off Book)
150g unsalted butter softened 
150g caster sugar
100g self raising flour sifted 
3 large eggs at room temperature 
1/2 tsp baking powder 
60g almonds
1 tbsp milk

For the icing 
250g icing sugar 
2 tbsp lemon juice 

To decorate 
12 glace cherries
Makes 12

Method: 
1. To make the pastry. Rub margarine and flour with fingers until breadcrumb texture. Add the salt and icing sugar and mix with a fork. Keep the pastry as cool as possible, you don't want the margarine to melt. 
2. Add 1 tbsp of the water and bring together to a dough with your fork. You make need more or less water. If the pastry doesn't come together after 1 tbsp add another and mix until just combined. There should be very few crumbs at the bottom of the bowl. 
3. Bring together quickly with your hands in a ball and wrap in clingfilm. Chill for half an hour. 
4. Roll out the pastry and using a large round cutter cut out 12 rounds that nestle inside the cupcake tray and come about half way up the cupcake hollow. I usually experiment with using glasses until I get the right size. 
5.  To make the filling beat the butter and caster sugar until fluffy, about 5 minutes with an electric beater. 
6. Add the eggs one at a time with a large heaped tablespoon of flour with each egg to stop the mixture curdling. 
7. Finally fold in the almonds, baking powder and flour and mix well. 
8. Place a teaspoon of jam into the middle of each of your pastry rounds. Cover with frangipane mix until the hollow is two thirds full. Bake in a 190oC oven for approx 15 minutes until a skewer comes out clean. Leave to cool. 
9. Beat together the icing sugar and lemon juice for the icing. Spoon it over the cupcakes and add a cherry to each.


I've been dying to use my newbridge silverware cupcake stand that I got for my birthday- bakewells are definitely worthy! 

Saturday 28 April 2012

Coffee and Walnut Traybake with Coffee Icing


There are some things that I'm snobby about. Its not very nice I know but I can't help it. Like stuffing you get in a cheap carvery. I'd rather eat sawdust from a hamster's cage. Or scones you buy in the supermarket. They taste like someone went crazy with the baking soda and stick to the roof of your mouth like kiddies playdough. I can't help but visibly turn my nose up at them. Probably the most common things for people to get snobby about are coffee and wine and hilariously I have strong feelings about neither. In fact I find wine tasting an hilarious melodrama. You say it tastes like fields of raspberry plants under a full moon I say where's the Sprite so I can sweeten this thing up and make it drinkable.

Similarly with coffee I think people take it all too serioulys with phrases like 'full bodied' and 'silky' and conversations about Columbian versus Peruvian beans. They invest in expensive expresso machines they never use and start furiously grinding coffee beans at home. I'm a-half-spoon-of-instant coffee, full-spoon-of-sugar kind of girl. I can hear coffee lovers everywhere wince but I'm hoping I'll win some respect back with this classic coffee and walnut cake. The coffee flavour is quite strong but the sponge is light and fluffy. Enjoy!


125g unsalted butter softened
125g caster sugar
2 large free range eggs
150g self raising flour sifted
1 tbsp instant coffee dissolved in 1 tablespoon hot water
75g walnut pieces

For the icing
200g icing sugar
85g unsalted butter melted
2 tbsp instant coffee dissolved in 2 tbsp hot water
3 tbsp cream
25g walnut pieces

1. Preheat the oven to 180oC.
2. Beat the butter and sugar with an electric whisk until creamy and pale.
3. Gradually add the eggs with a heaped tablespoon of flour. Beat well after each addition.
4. Then add the coffee liquid and mix lightly.
5. Add the sifted flour and walnut pieces and fold in gently. Bake for 20 mins in a traybake tin (approx 25 x 20 x5cm) until golden.
6. Remove from the oven and loosen with a knife around the edges. Gently ease the cake out and allow to cool on a rack.
7. To make the icing sift the icing sugar. Add the melted butter,coffee liquid and cream and beat for around 2 minutes until creamy Leave to sit in the fridge for about half hour. Spread over the traybake and scatter walnuts.

Thursday 19 April 2012

Peppermint Chocolate Mousse Cake


I love the Springtime, when the first glints of Summer pierce the endless cold and darkness of Winter. Evenings are my favourite time of the day, after 5-ish. On a Springtime Sunday the hustle and bustle of getting the big dinner is over and the house sighs with relief. Give me a cup of tea, a slice of cake and I'll curl up in the best armchair in the house like a old fat cat. This cake is really something special and I have to say I'm chuffed with the way it turned out. Its not as hard as it perhaps appears when you read the instructions. The sponge is actually quite flexible and so it is easy to manipulate it into the tin. The recipe I used told you to bake two big sheets of sponge and cut the circles top and bottom from it. Instead I just used the sponge tin to cook the circles- I thought that it would leave less waste and avoid that messy cutting out business. I then baked the rest on the mix in a rectangle tin and trimmed them to be the sides of my cake.

Adapted from the Great British Bake Off book

For the paste
100g unsalted butter softened
100g icing sugar softened
3 egg whites at room temperature
100g plain flour
green food colouring

For the sponge 
4 large egg whites plus 4 whole eggs at room temperature
15g caster sugar
150g ground almonds
150g icing sugar
25g plain flour
55g unsalted butter melted and cooled slightly.

For the mousse 
175g plain chocolate
2 sheets of leaf gelatine or 1 tsp powdered gelatine prepared according to packet instructions
2 large eggs separated
1/2 tsp peppermint essence
300ml double cream whipped.

2 x loose bottomed (preferably springclip tins) 18cm
1 x rectangular tin 20 x 23cm

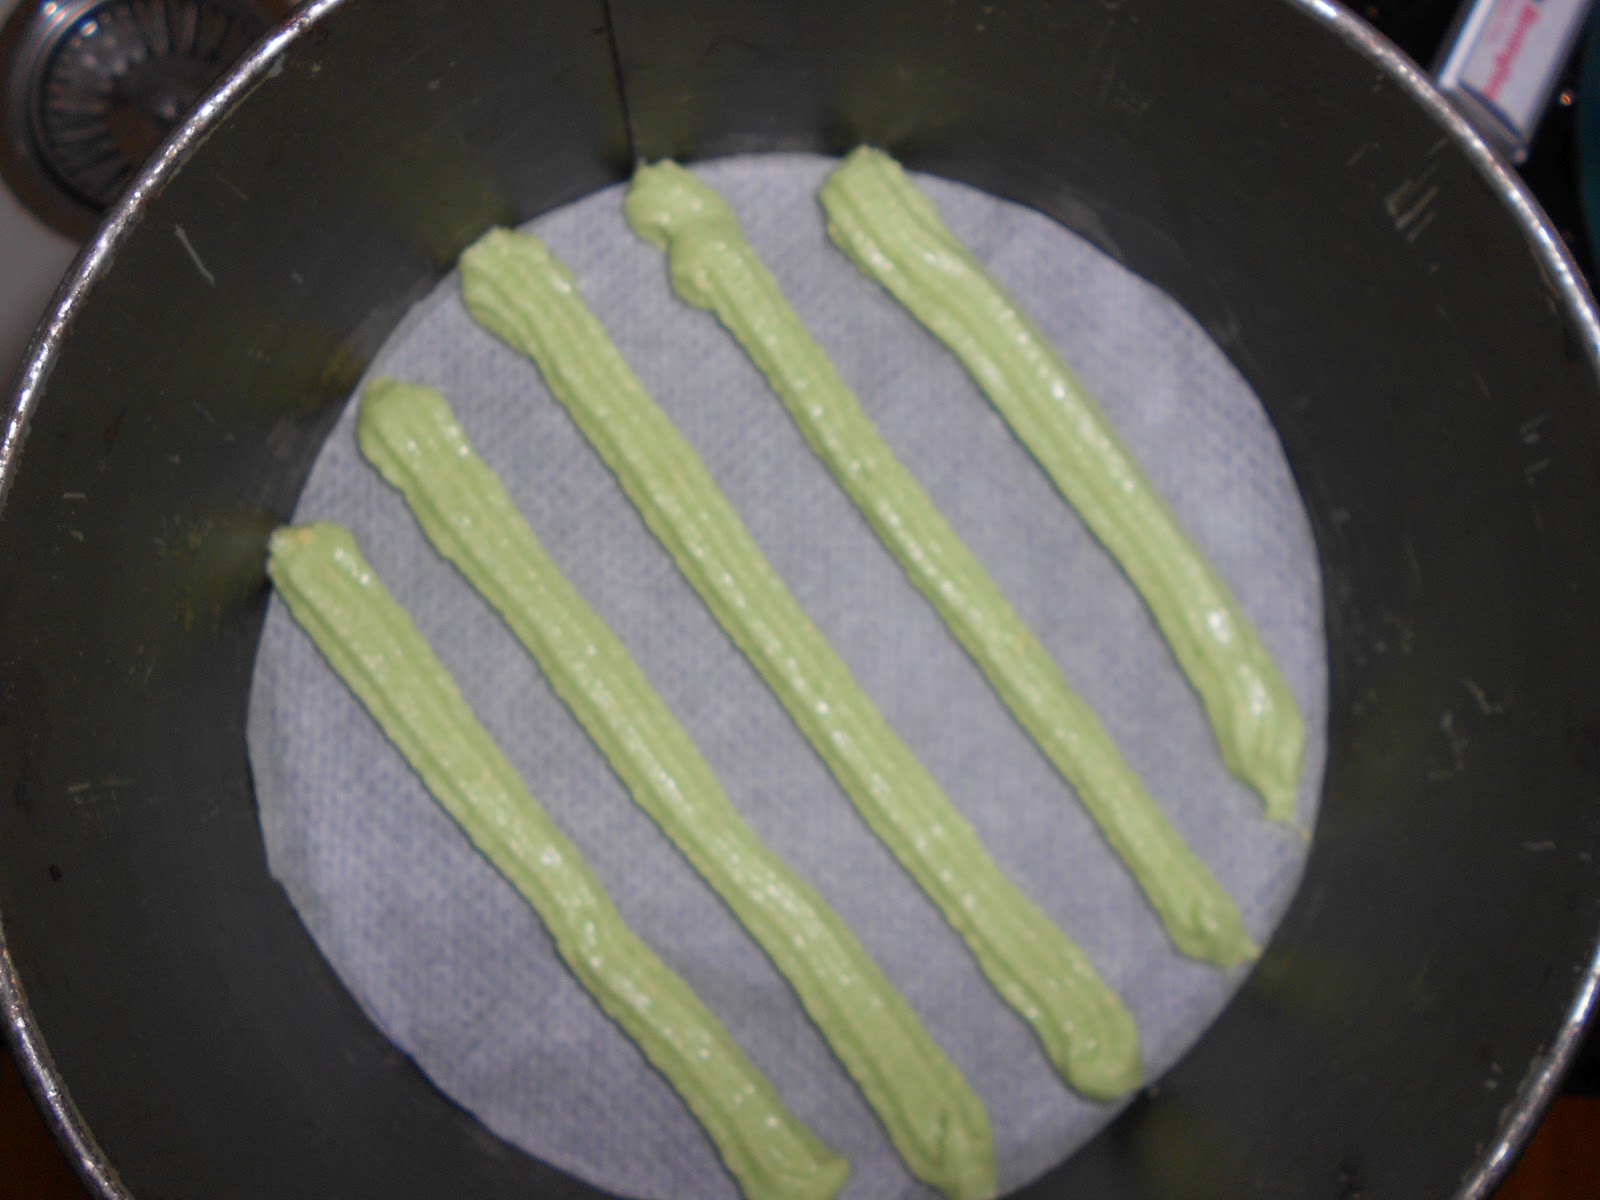
1. First for the paste. Beat the butter and sugar together until light and fluffy. Gradually whisk in the egg whites and continue whisking for 2 minutes. The mixture will look a bit suspect. Like this:

Yes it looks like a mess but reserve judgement. When you fold in the flour the mixture should come back together again. Using the tip of a knife add the colouring and fold in.
2. Pipe the paste into lined tins in swirls/patterns. I used two 18cm round cake tins and one rectangular tin, 30cm x 23cm.

The rectangular tin which will make up the sides of the cake


3. Leave the tins in the freezer for about 1-2 hours. This is important and cannot be skipped or else when you put your chocolate sponge mix on top the green paste will bleed into the sponge and you will lose your lovely design. 

4. Now to make your chocolate sponge. Beat the egg whites in a separate, clean glass bowl with the caster sugar until dry and stiff. They will not be as shiny as proper meringue as there isn't enough sugar but they should hold the trail of the beaters and form peaks. 
5. In another large bowl beat almonds, icing sugar and whole eggs for about 3 minutes until light, thick and increased in volume. Sift the flour and cocoa on top and then fold in. Finally fold in the melted butter. 
6. Pour over the tins and ease the mix around your designs. I tilted the tins to get the mix to fall itself. The layers should be thin, about 1 inch thick.
7. Bake in a preheated oven for 7-9mins @ 200oC until springy to the touch and golden. 
8. Turn out carefully on sheets of greaseproof laid over a cooling rack. Definitely don't skip this step, the sponge is quite sticky and will stick to your wire rack and make it impossible to get off without breaking it. 
9. Place one of your circles, pattern side out on the bottom of the cake tin you cooked it in. I lined the cake tin with cling film to make it easier to invert before I served. Cut the rectangle piece in half lengthways so you have two long pieces. Measure the circumference of the tin with a piece of string and trim the two pieces so together they are the circumference of the tin with about 1 inch/2cm extra.
10. Carefully lift one of the pieces are press it gently into the curve of the tin. The other piece should be about 1 inch/2 cm too long. Lift your longer pieces and press it into the curve tucking the long end in tight to the other piece of sponge so that this pressure holds the sponge together. 
11. Now for the mousse. Melt the chocolate gently in the microwave. Add the egg yolks and peppermint essence and mix until combined. 
12. If using leaf gelatine, soak the leaves according to packet instructions and then pop in the microwave for 10-20 seconds until fully dissolved. If you have lumps in the gelatine these will be nasty in the mousse. If using powder melt carefully according to the packet instructions. Allow to cool before folding into the mousse. Fold in the whipped cream. 
13. Beat the egg whites like you did with the sponge mix although they won't be quite so stiff. Fold into the chocolate mixture. 
14. Pour the mousse into the cake lined hollow you have made. Trim the side pieces so that the mousse is about 2cm from the top of the pieces. Press your top circle patterned side out on top. 
15. Leave overnight to chill. 
16. Run a knife around the edge of the cake and using the loose bottom push the cake up out of the tin. If you have a springclip tin you just need to open the clasp gently. 


17. Decorate with piped whipped cream and crumbled chocolate flake/grated chocolate. 

Ta to the Dah if I may say so myself


Tuesday 17 April 2012

Swiss Meringue Buttercream- Trials and Tribulations

I once did a communications workshop where the instructor told us that the worst way to begin a speech or address was to say how boring it was going to be because the audience will automatically tune out. So I'm putting that story out there but saying no more...

Swiss Meringue Buttercream Icing (from now on SMB because I'm a lazy so-and-so) is the rolls royce of frosting. Light and fluffy, its like eating a buttercream so smooth it feels like whipped cream. But before you start furiously separating eggs I would advise caution. My frosting ended up a curdled scrambled egg like mess and only for this website I would have had to chuck it in the bin. Luckily the advice in this (invaluable) blog post (SMB HELP!) actually works and got my frosting back on track, silky and delicious.


Here are a few things I learned
A. Be prepared, cube your butter, have everything at room temperature, have ingredients weighed and food processor/beater organised.
B. Pop it in the fridge if you feel that it is too light/soft. If after 30 minutes its still too soft beat again.
C. Make sure there are no little lumps of butter in your icing.
D. Use a sugar thermometer.
E. Watch this video- she simplifies it a lot but at least you can see the textures and get a rough idea of what you're looking for. Dyann Bakes SMB

From 'How to Eat a Cupacke'
170g caster sugar
3 egg whites
1/8 tsp salt
170g unsalted butter

1. Place the salt, sugar and egg white in a heatproof glass bowl over a pan of simmering water. This is called a bain marie. The bowl should not touch the bottom of the pan so you might need to fiddle around with your collection of bowls and pans to get a bowl that sits in about half way but doesn't touch the bottom.
2. Beat constantly until the thermometer reads 140-160oF (different sources say different temperatures, I presume within the range is fine). Now you have pasteurised your egg whites so they are safe to eat.
3. Take off the heat and beat with the whisk attachment of your food processor until the bowl is cold and the egg whites are thick and shiny. This will probably take about 6-7 minutes.
4. With the paddle attachment of your food processor (as per Dyann bakes) add the butter cube by cube beating well after each addition. Increase speed and beat for 4-5 minutes until the icing is thick enough to hold shape on the top of the cupcake. If you think it is too light stick the bowl into the fridge for 30 minutes. If your icing has gone curdled/separated follow the tip in the blog above and heat 1/4 of the mixture in the microwave for 10 seconds, then add back into your icing and beat thoroughly.
5. Fold in any flavours or colours (although I wouldn't advise using liquid-y colours as they could mess up the consistency, use gel colours preferably).

Good luck!

Saturday 14 April 2012

Malted Cupcakes and How to Decorate Beautiful Cakes Magazines


I used to love reading fashion magazines. Thick glossy pages of vibrant colour, beautiful models, juicy celebrity gossip. But recently I've sort of grown out of them and rarely buy them any more. I used to flick through, look at the shiny pictures and then they'd form a jenga-like stack in the house, collecting dust and dating almost instantly. Considering the use you get out of a good book magazines are appallingly bad value. And with the internet today, fashion and celebrity and just a google search away. So when my friend Grace bought one of these new DeAgostini 'How to Decorate Beautiful Cakes' magazines I was pleasantly surprised by how good value they were. The first issue came with two sets of butterfly cookie cutters and a cardboard cupcake stand. The magazine itself (albeit very short) had good colour photos and step-by-step illustrations. Of course the first issue is always at a knock-down price so they can reel you in and then stick you with a €7 charge for the next issue. But the second issue was only €3.50 which , considering you got three reusable piping bags and three piping heads was still good value I thought. I've used all the piping heads and the bags and they really have surprised me in how durable they are. Usually the stuff you get is about as useful as the rubbish in a Christmas cracker but the couplers are made out of strong plastic and the piping heads are great sized. For the cupcakes above I used this nozzle:

I think it makes a lovely swirl for cupcakes. So yeah I presume these magazines are available only in England and Ireland but if you see them and are as nerdy as me in enjoying collecting baking paraphernalia I would check them out!

If you aren't familiar with Ovaltine its sold in pretty much any supermarket. I hear old people like to drink it before they go to bed. And it is used in malt shakes to which I daresay I am partial....

From the 'Cupcakes from the Primrose Bakery'

110g unsalted butter, at room temp
120g light brown sugar
100g caster sugar
2 large eggs, beaten lightly in a cup
125g self raising flour, sifted
60g plain flour, sifted
60g Ovaltine malted drink powder
125ml semi-skimmed milk
1/2 tsp vanilla extract

1. Cream the butter and sugars together until fluffy and light, about 5-6 minutes.
2. Add the egg slowly one third at a time with a tablespoon of flour each time. Throw in the vanilla extract. When all the egg is gone, fold in one third of the dry ingredients with one third of the milk until all the dry ingredients and milk are incorporated.
3. Bake in cases at 180oC for 15-20 minutes. My batter was very light and moist so it took almost 20 minutes. Insert a skewer and when it comes out clean the cupcakes are baked.

These were iced with Swiss Meringue Buttercream icing which is separate blog post to follow!

Friday 13 April 2012

Lazy Girl Kitchen Sink Chocolate Slice


I'll tell you a shameful secret. I'm not a nice person when I'm tired... or hungry. I'm not talking sour and grumpy I mean demonic. You know when you are at a wedding or family occasion and some child throws a titanic tantrum, screeching like a banshee and drumming their heels on the floor..? The mother hushes and shushes red-faced while onlookers knowingly comment that the child is 'over-tired'. Well I'm the child in this scenario and last Sunday when we went for a misguidedly long mountainous walk, my mushroom hating boyfriend was that embarrassed Mother. At one stage I sat down on a rock and refused to move. When he tried to justify the steep incline by commenting on the lovely view of the lake and valley I told him that he had to be sado-masochistic to be enjoying himself and that he was going to have to cart me around in a golf buggy for the rest of my life. He is so good natured he just laughed at me. That may have infuriated me more...


Anyway the next day on Easter Monday the girls were coming down and I wanted to make something but my legs were killing me. Therefore the 'lazy girl kitchen sink chocolate slice' was born. It is sort of Rocky Road with what you fancy thrown in for sport.


Adapted from 'Scrumptious' by Diverse Abilities Plus

1 can of condensed milk
300g plain chocolate
1 tbsp golden syrup
75g butter
125g mini marshmallows
150g maltesers
100g digestive biscuits
175g raisins

1. Bash up maltesers and biscuits in a bag with a rolling pin. You want nice big chunks so go easy!
2. Melt condensed milk, chocolate, butter and golden syrup together in a pan over a GENTLE heat. Keep stirring regularly- there is nothing worse than the smell of burnt chocolate (apart from the smell of burnt hair but that is a whole other blog post)! Allow to cool for at least 5 minutes or your marshmallows will melt.
3. Add the rest of the ingredients and stir gently until all is combined.
4. Pop in the fridge for about two hours.

Saturday 7 April 2012

Easter Cupcakes

Easter is a funny holiday. You have that blood and gore Christian imagery, being force-fed vinegar and general bad-time-crucifixion. Then juxtaposed beside it you have pictures of baby chicks, fluffy rabbits and springing lambs. Needless to say I've gone with the latter to decorate cupcakes. Not that the passion of the Christ in sugar paste wouldn't be just as delicious I just think the sculpting might be a bit beyond me... I'll leave that to Michaelangelo and the likes...


Blueberry Cinnamon Scones


Guess what I watched today? Columbo. It was amazing. I'm adding Columbo to my list of favourite TV characters after the undeterrable Jessica Fletcher, a heroine of mammoth intelligence from 'Murder She Wrote' fame. You just cannot beat a good murder mystery on a slow Saturday. I'm partial to an Agatha Christie novel or a good TV adaptation and I wouldn't say no to Inspector Morse either, grumpy but loveable. Before you dare to criticise my grand-dad-like TV choices I ask you whether you watch one of those Britain's Got the X-Factor Voice Idol programmes that seem to block up programming on a Saturday night like grease in a fat man's artery. How people can tolerate this tired formula constantly spat out in some mildly different way is beyond me. The sob stories, the emotive music, the choreographed bickering between judges and Simon Cowell grinning like a Cheshire Cat. I'm surprised he can hear the singing over the 'Ching!' of the cash register. Life is too short.

These scones are a nice variation on an old classic. The blueberries give a beautiful marbled effect and the cinnamon warms the scone. Leave out the blueberries and cinnamon and you've got the classic English scone. You could add sultanas (favourite of mine) or other dried fruits to the basic mix.

11oz plain flour
1 tsp baking powder
25g caster sugar
1/2 tsp salt
3oz butter, cold and diced
6 fl oz made up with 1 egg and the rest with milk
100g blueberries washed and dried
2 tsp cinnamon

1. Sieve the flour, baking powder and cinnamon. Add the salt. Rub in the butter with your fingertips until the mixture resembles butter or use the food processor.
2. Add the blueberries and mix lightly.
3. Make a well in the centre of the dry ingredients. Add the milk and egg and mix until thoroughly combined. You might need a bit more milk if there are dry crumbs that don't come together and lie at the bottom of the bowl. The dough should be moist but not sticky. You should be able to press it with your finger and your finger comes away clean.
4. Roll out the dough1 inch  inch thick on a floured surface with a floured rolling pin.
5. The cutter I used was 2.5 inches/6 cm. You could use a glass or cup if you are stuck. Press down firmly for nice clean edges on your scones. Naturally you will burst some blueberries, don't worry about that.
6. Place spaced apart on a greased baking sheet. Brush with a little milk. This will make the scones look glazed and shiny golden on the top.
7. Bake in 200oC oven for 10-15 minutes. They should be golden rather than pasty. Leave to cool and serve warm with real butter and jam.

Thursday 5 April 2012

Whoop over 1000 page views!

Haven't looked at my Stats in ages. I check today and see I have over 1,000 page views! Wow that is really cool! Although I have to work on getting these people to join as friends.... If only I could set up some computer programme that traps them on my page until they join... You know like some of those really annoying pop-up websites? Since I'm currently drowning in the confusion that is flickr/tumblr/pinterest, a complicated computer engineering mission is probably beyond me...

But Thank You to everyone who has, for one reason or another flicked onto the blog. It was something I set up after college to encourage me to be a bit more creative and I am getting so much more out of it than I thought I would.

Deirdre, xx


Tuesday 3 April 2012

The 'New Me' and Peanut Butter Blossoms


So the post exam honeymoon period is over and I'm no longer content watching continuous hours of bad TV. This is my 'New Year' where I start making resolutions and setting goals. The fact that I do this every time I finish exams and am consistent only in failing to achieve any of the targets I set has not fazed me this time around. No because the 'new me' is going to follow through this time. I have already bought the yoga mat and downloaded 100 books to read before you die. Not only will I be trim and lean but I will be the renaissance (wo)man of literary appreciation and taste. I'm aiming for the body of Elle McPherson and the mind of Stephen Fry. Not an immodest goal. Hmmh... Will keep you posted.

I ordered Hershey's kisses from the US when the girls were on holidays for the sole purpose of making these adorable cookies. If you don't have the kisses you could always use a couple of chocolate chips or just make the cookies without the topping. The cookie is light and flaky with a heavy peanutty taste.

110g unsalted butter softened
60g caster sugar
75g light brown sugar (dark would be too bitter here)
170g smooth peanut butter
1 egg lightly beaten
1 tsp vanilla extract
1 tsp baking powder
200g plain flour sifted
1/4 tsp salt

1. Beat sugar and butter together until fluffy, about 5 minutes. Add the peanut butter and beat for 2 minutes until smooth.
2. Add a little beaten egg and a heaped tablespoon of flour and beat until incorporated. Continue until all the egg is used up. Beat in the vanilla extract.
3. Sift the flours together in a bowl. Add to the rest of the ingredients and beat gently and quickly.
4. Roll into large 1 inch balls. Pour a couple of tablespoons onto a plate and roll the the dough balls. Place on a greased sheet.
5. Bake in a 180oC oven for 8-10 minutes until golden.
6. Take out of the oven and immediately push a hershey's kiss on the top. Do it gently, you don't want to split the cookie.
7. Allow to cool.

Sunday 1 April 2012

Strawberry Cheesecake Cupcakes


Oh hello! Things have been a bit hectic recently. Exams are no fun. Minus fun. I'm glad to be back to living a normal life. And back to baking! So what's on the menu? Well I was in one of those moods on Friday evening after work. You know when you want to do something but you just don't know what and everything you start you don't feel like finishing? Its horrible that kind of restlessness. I think it was because I was used to compartmentalising the day, squeezing in some free time, 30 minutes for dinner, 40 minutes watching TV etc etc. Then on Friday I just literally did not know what to do with myself. All this free time was staring me in the face. There were a few projects I'd been looking forward to, icing cookies, piping flowers, baking beetroot chocolate cupcakes but they all just seemed like a little too much effort. So I settled on baking these babies- dessert meets cupcake. It was the cream cheese that sold it for me, its all about the cream cheese.

From 'Cupcakes from the Primrose Bakery'

Makes 15 regular cupcakes
225g caster sugar
210g self raising flour
1 tsp baking powder
25g cornflour
125g fresh ripe strawberries, crushed (I blitz-ed them in a food processor)
225g margarine, softened
4 large eggs at room temperature

1. Cream the butter and sugar together until fluffy and pale- about 5-6 minutes. Add the eggs one at a time with a heaped tablespoon of flour.
2. In a separate bowl blitz the strawberries, baking powder, any remaining flour and the cornflour.
3. Fold in the strawberry mixture until evenly combined.
4. Fill the cases two-thirds full and bake for 15 minutes at 180oC until a skewer comes out clean.

87g cream cheese
225g icing sugar
65g unsalted butter, diced
pink icing sugar

1. Cream together all the ingredients until smooth with an electric beater. This will take about 5 minutes and should be white as opposed to yellow.