Friday 28 October 2011

Halloween Chocolate Cola Cupcakes


The cupcakes are from Nigella Lawson's How to be a Domestic Goddess. I'm not going to win over any foodies by saying that I'm not a big fan of Nigella. That part at the end of every episode where she goes down to the 'larder' in her dressing gown and starts eating like she's in a Snoop Dog video is just too cheesy for my tastes. But I won't fault her on these cupcakes! The batter is very light (so much so I was sure I had added too much liquid) and this gives a lovely moist cupcake. The cola flavour is subtle, but a nice additional to the traditional chocolate cupcake. She makes a glaze but I didn't bother and just served with a traditional buttercream coloured black and my halloween decorations that I've been blogging about the last few days. Pretty cute I think!

For the cupcakes
125g unsalted butter
250g golden caster sugar
2tbsp cocoa
175ml coca cola
200g plain flour
1/4 tsp salt
1 tsp baking powder
1 egg lightly beaten
125ml buttermilk
1 tsp vanilla extract

Method:
1. Heat the butter gently until almost melted. Add the cocoa powder and cola and warm gently until all the butter is melted. Whisk quite rigorously until combined, the cocoa powder especially will take some whisking to incorporate.
2. Sieve the flour and baking powder into a large bowl and add the salt. Mix to combine.
3. In a jug mix the buttermilk, egg and vanilla extract together.
4. Add both sets of wet ingredients to the dry ingredients and mix until combined. Make sure all the flour is incorporated but don't overbeat.
5. Pour into cupcake cases and bake for 15 minutes at 190oC fan oven or until a skewer comes out clean.

Buttercream
40g butter softened
200g icing sugar sieved
1 tbsp coca cola
Blob of black food colouring

Method:
Beat all the ingredients together with an electric whisk until the icing is creamy and there are no lumps of butter (about 3-4 minutes, you really cannot overbeat). You may need to add a tbsp more of cola if there is still dry icing sugar inthe bowl but beat well before you make any additions. The icing may seem too dry but after beating it may be the right consistency.


Bones

Roll icing into two thin sausage shapes using a small glass (this gives nice flat edges where your hands won't). Using a cocktail stick push two incisions into the icing at either end to give that two ended bone shape. Using one finger roll the bone so it is thinner in the centre.

Zombie hands

Shaun of the Dead is a great movie, the best of silly British comedy. These decorations are zombies crawling out of the ground (if you use your imagination!) Colour a weird green for that extra effect.

Dip one end of a cocktail stick in green food colouring (I just used the cheap liquid variety). Rub the end of the cocktail stick in a ball of white ready roll icing and knead until the colour is fairly evenly distributed.


Roll into small balls on a piece of clingfilm and flatten into discs. Cut fingers out with a sharp knife, placing the disc flat on the clingfilm. Remember to leave a gap between the thumb and the next finger. Round the fingers out fingers by squeezing them gently.

Cut a piece of a drinking straw about 2cm long. Push 1cm into the zombie hand very gently leaving 1cm out for pushing into the cupcake so the hand 'stands up'.

Thursday 27 October 2011

Mask from the Movie Scream/Skeleton

Roll the icing into white balls. Flatten the balls with your thumb into thick discs. Squeez the bottom the disc gently to give the 'chin'. Use a cocktail stick to carve out empty eyeball sockets, two small lines for the nose and a horizontal line for the mouth.


Easy Halloween Decorations -The bloody eyeball!

I have hazy childhood memories of Halloween, it was never really a big event. We bought pound-shop gaudy masks and cut eye holes out of black plastic bags and white sheets. There was no fancy dress shops or elaborate costumes. I remember one year going around the village with my best friend. We went into the pubs (it was more innocent times) and were rewarded with a bag of King crisps each  (you may need to be Irish to get this reference- they are the best cheese and onion crisps ever!).

In the in-between years dressing up was unfashionable and childish and it wasn't really until last year when Mr Mushroom Hater had a fancy dress 21st party that I embraced the holiday. Over the next few days I hope to put up some ideas up for using ready roll icing to create easy cupcake decorations.

The Bloody Eye Ball 

1. Dye a small ball of icing green or blue. Dye a very small ball of icing black.

2. Roll a ball of white ready to roll icing and flatten under about 1cm thick. Roll the blue or green icing into smaller balls and squash on top of the white discs. Finally squash the small black balls onto the discs for pupils.

3. Using a cocktail stick dip the stick into the colour and drag across the white disc to make bloody eyeballs.


Tuesday 25 October 2011

Book Review- Planet Cake


Cake decorating books are my current craze. This book is a true beauty from the world famous bakery Planet Cake, the Elle magazine of cake decorating books. The pages are thick and glossy with exquisite pictures. However I am highly skeptical of the claim on the blurb that this book appeals to beginners. I'm no beginner but I wouldn't be able to attempt some of the cakes or cupcakes in this book. Some of the creations require more artistic than cookery skills.

The beginning of the book is useful. It has step by step pictures of basic techniques using fondant and ganache, e.g. covering a cake, making bows.

And it also features a good troubleshooting page, e.g. how to deal with stains and air bubbles. For me though it is more of a feast for the eyes than a practical book.


Princess Cake


Leopard Print Boot

Handbag

I mean, amazing right? No doubt, but not very do-able at home. Unless you are really artistic and have a heck of a lot of time and patience. In the book's defence they don't skimp on detail and have plenty of step by step sketches but I still don't think that would get me through.

I did find a few decorations I thought I would attempt:

Monster Cupcakes

The instruction page for monster cupcakes

Bow Cupcakes

Saturday 22 October 2011

Spanish minestrone

I am DYING..... with a cold. Its very unpleasant, not to mention unattractive, sniffling into nasty tissues and wheezing like an old man. The weather in Ireland today was rainy but even for rainy weather it was particularly horrible. I had to turn the light on in the kitchen because it was so dark and coupled with my cold, the low grey skies made me gloomy. I needed something comforting, something to chilli-away my bad mood. There wasn't much chance I was going outside and chancing the rain so I made this soup from what was in the house. It is like a minestrone, in fact you could just take out the chorizo, add bacon and pasta instead and you would have a lovely minestrone.


700g chorizo very thinly sliced
1/2 tsp chilli powder (optional)
3 carrots, peeled and diced
2 red onions peeled and thinly sliced
2 garlic cloves, crushed and finely chopped
2 sticks of celery
450g tin of chopped tomatoes
1 tbsp tomato puree
1 bay leaf
few sprigs of thyme
550ml veg/chicken stock
450 tin cannellini beans, drained and rinsed

Fry the chorizo in a tsp of oil. The chorizo will create its own oil so there is no need to add much.  Add the onions, carrots and celery and fry for about 4 minutes until soft but not browned.

Add the garlic and chilli powder if using. I used extra spicy chorizo so I didn't add chilli powder but if you are using ordinary chorizo and you like a kick add the chilli powder. Even ordinary chorizo will infuse the soup with it's spicy flavours anyway so if you want to play it safe, leave out the chilli powder.

Add the tin of tomatoes, stock, bay leaf, thyme and tomato puree and simmer for about 15 or until the carrots are soft. Add the cannellini beans for the last five minutes of cooking, you don't want them mushy.

Serve with crusty bread.


Friday 21 October 2011

Ice cream cake

Some children never grow up. I'm not talking Peter Pan here but the boy in my life who, without fail, will order ice cream for dessert every time we go out for a meal. And don't even mention sharing or you'll get shot down faster than a fighter pilot. I used to be very unimpressed by this practice and even fairly incredulous. I mean ice cream is nice and all, great on a hot day but its no sticky toffee pudding, lemon meringue pie or Bailey's cheesecake (to name but a few of the 'greats'). I have however, learned to love this idiosyncrasy and find it quite funny. So when Mr Mushroom-Hater's birthday drew near I decided to make him an ice cream cake. Its something I haven't done before and wasn't quite sure how it would work. My biggest worry was that a hacksaw would be needed to cut the frozen cake and then it would taste like a lump of ice but actually the cake froze really well, as did the pavalova with was really mallowy and soft.

This cake is so adaptable. Buy different flavours of ice-cream, make your own, chop up your favourite chocolate bar (e.g. dime, crunchie) and fold into the ice cream. I didn't have much time to decorate, this week has been hectic for loads of reasons but I think the taste made up what was lacking visually!


For the cake
175g butter, softened
175g caster sugar
3 eggs lightly beaten
170g self raising flour sifted
1 tsp baking powder
4 tbsp cocoa powder
25g chocolate melted

For meringue 
3 egg whites
175g caster sugar

1. Make the cake in the normal way, cream the sugar and butter until pale and light. Lightly beat the eggs together then add alternatively with a few tbsp of flour/baking powder/cocoa powder. Fold in the remaining flour with the melted chocolate.
2. Before you grease the tin, mark out two circles using the tins bottoms as templates. Pour into the greased 20cm cake tin. Beat for 20-25 minutes until a skewer comes out clean. Leave the cake to cool and then cut into two lengthways to make two thinner cakes.
3. To make the meringue tip the sugar into a small roasting tin and warm in a preheated oven for about 5 minutes. Turn the oven down to 110oC.
4. Whisk the eggs with an electric mixer until frothy. Tip all the hot sugar in in one go and continue to beat on high for about 8 minutes until the meringue is cold, very stiff and you can turn the bowl upside down without the meringue coming out.
5. Put the meringue onto the two circles and spread to just before the pencil lines.
6. Bake for 1.25 hours in the oven. Leave the door ajar and turn off the oven. Leave until completely cold. This may take a few hours.

To assemble
1 litre vanilla ice cream
1.5 litres chocolate ice-cream

Start with a cake layer, spread with the vanilla ice-cream. Top with a layer of the meringue. Very carefully spread chocolate ice cream on top making sure not to crack the pavalova. Top with another pavalova, another layer of vanilla and then the final cake layer. Spread the chocolate ice cream on the top of the cake and over the sides if desired. Decorate as desired.

Saturday 15 October 2011

Sweet Coconut Rolls

Bread or cake, bread or cake....? Oh the troubles of a Saturday evening. So I met my cravings head on and made these sweet coconut rolls. Brioche-y on the outside with a sweet buttery filling. I think Jason made these on the Great British Bake Off Show and I really thought he came up with some interesting flavour combos. I got these from the book from the second series.


For the dough
500g strong white flour, sifted
60g unsalted butter
1 x 7g sachet fast action yeast
40g caster sugar
1 1/2 tsp sea salt
2 large eggs, at room temp beaten
about 200ml lukewarm milk

For the filling
100g desiccated coconut
50g unsalted butter
50 light muscavado sugar

To make the dough
1. Toast the coconut in a non stick frying pan for about 5 minutes or until golden, stirring constantly. Tip into a bowl and add the icing sugar, then leave to cool.

2. Sift the flour, rub in the butter until breadcrumb texture. Add the yeast, caster sugar, coconut and salt and stir to combine.

3. Mix the eggs and enough milk to make a soft but not sticky dough. Knead for 5 minutes. Leave to rise in a warm place for at least an hour or until doubled in size.

4. Meanwhile make the filling. Toast the coconut in the frying pan. In another pan or in the microwave melt the butter and sugar until liquid-y and add the coconut. Leave to cool.

5. Punch down the dough and turn onto a floured surface. To make the crescent shapes in the book make 12 balls from the dough. Roll out each ball to 5mm disc and spread a half tbsp of filling, cut the disc from centre to the edge and then fold into a cone, starting at the cut line and finishing at the cut line. Squeez the seams of the dough together (I needed egg to get the dough to stick). Face upright, bring the two crescent pieces together and squeez.

For the rolls (which I think are so much easier to make), split the dough into two roughly. Roll one half out to 5mm rectangle. Spread the filling leaving about 2cm at the edges. Brush the edges with beaten egg, then roll the rectangle from the long side so you are left with a long swiss roll like sausage. Press the end dough into the roll, the egg should help it stick. Cut the big roll into 6 pieces.

6. Leave to prove for an hour.

7. Bake for 20 minutes above a bowl of water in a 200c fan oven. Dust with icing sugar and serve with butter and jam.

Eco Friendly Kitsch Cook IV- Cooking in Season

Irish people are OBSESSED with the weather. No work day starts without a summary of current conditions, (as if people weren't fit to see it for themselves but anyway) followed by a prediction of weather to come which is based on the Irish 'spidey sense' and an early morning analysis of the colour of the clouds. The conversation is most always followed by a grimace and a sigh. In case any of you are unfamiliar with the general climate here on the Emerald Isle it can pretty much be summed up in two sentences. It rains a lot. It is sunny very rarely. But on the bright side we usually have quite mild winters and without the rain we'd be a lot less 'emerald'. Anyway I've just realised that my introduction has gone on a bit of a tangent and my real point is about cooking in season!

Knowing what fruit and veg are grown in your country and in what times of year is very important to the environment and to the quality of the food you eat. Eating in season cuts down on the giant carbon footprints that are created by ships and airplanes transporting food from one country to another. It also means that less chemicals are used on the food you eat as they do not need to be preserved for as long or withstand transit. Cooking in season also naturally mirrors your body's food cravings. In summer our bodies want light, cool food full of water, e.g. strawberries.

I mentioned the weather in my introduction as of course it has to be excepted that some foods just cannot be grown in your home country. Global warming is going to have to get seriously worse before you can grow a pineapple on Irish soil. So realistically you can't be expected to cut everything out of your diet that isn't available in your country but you should be aware of country of origin on the food packaging and try to cut down on long haul foods.

I found a great website for foods in season in Ireland http://www.bestinseason.ie/whats-in-season/, a bit of googling should result in the same sort of information for your country.

Sunday 9 October 2011

Twilight Cake


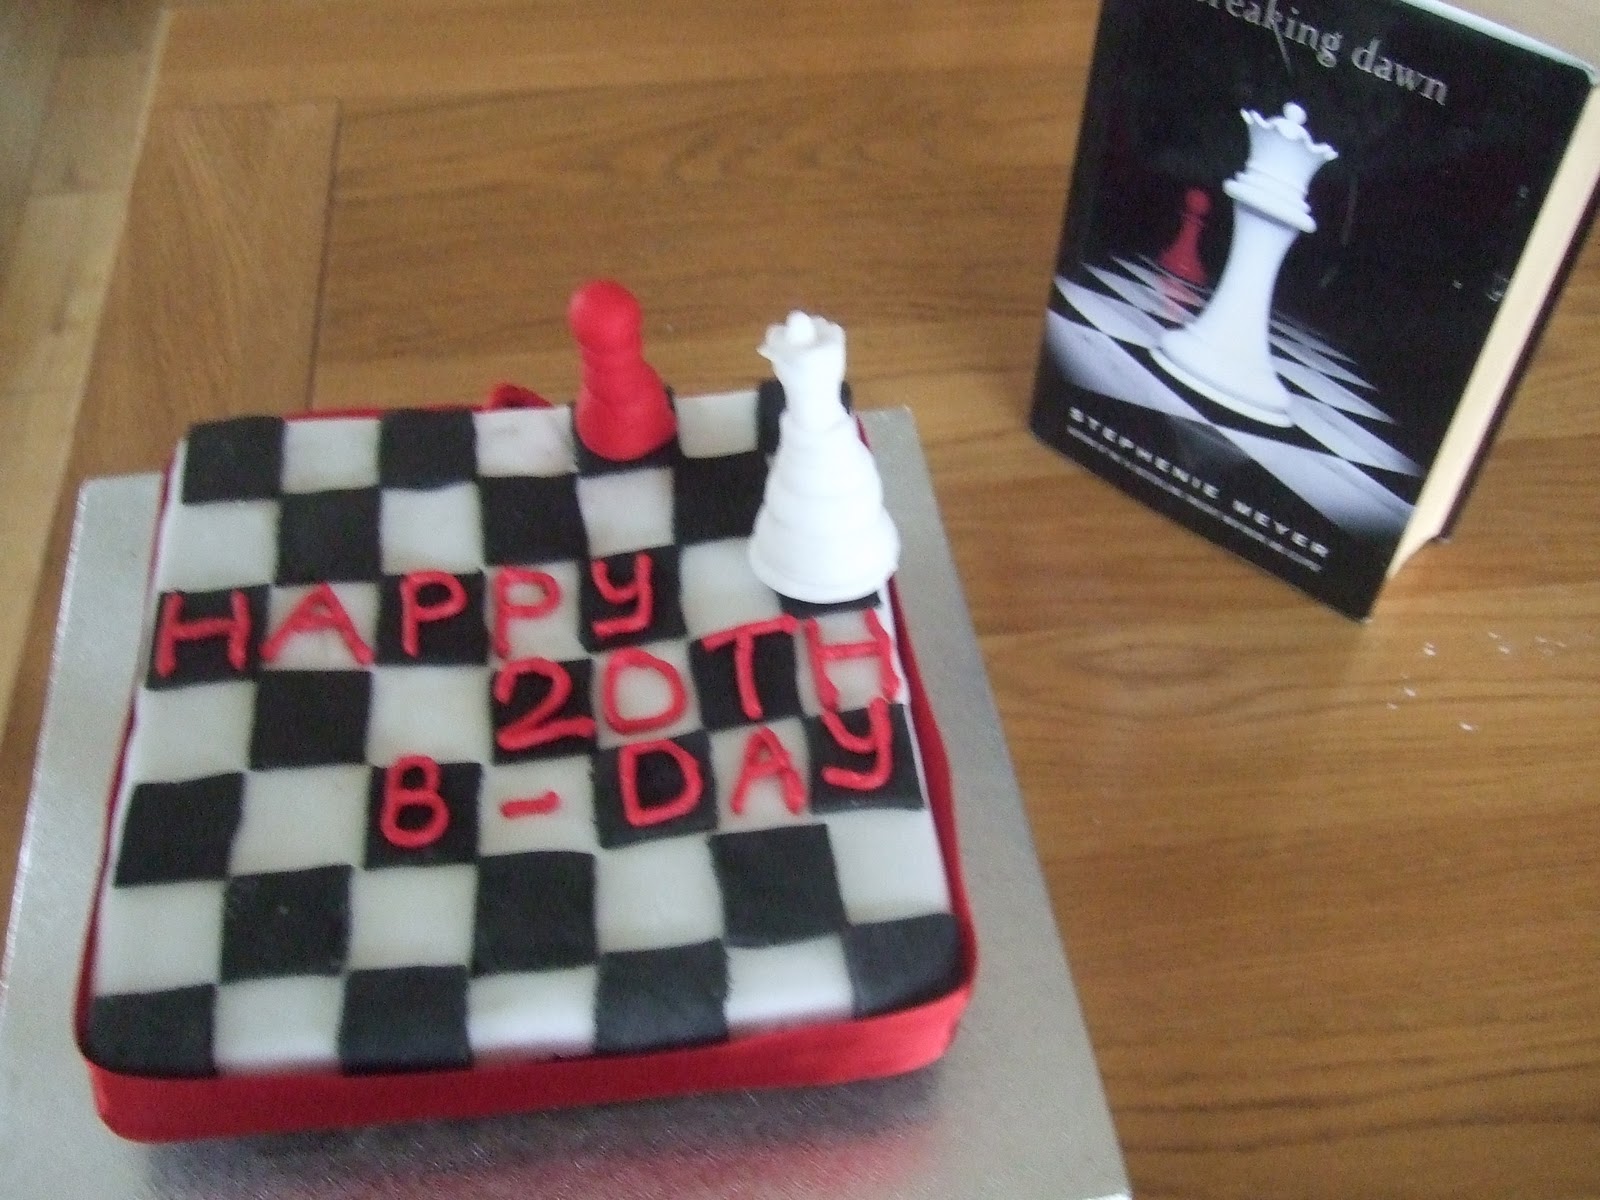
Twihards are surely itchy to correct the title of this cake having seen the pictures. I may be calling this a 'Twilight' Cake but I do know that it is in fact based on the 'Breaking Dawn' book cover, the final installment of the series. I wanted to do something special for my little sister's birthday and after tossing plenty of ideas around I settled on a Twilight theme - she is literally obsessed with the books and movies- but didn't know how to represent it on a cake. As fun as it sounded to try to sculpt Robert Pattinson out of ready roll icing I considered it a little beyond my capabilities (Let's face it, only God's hands could do justice to that work of art). You can buy cake decorations with characters from the movies on them, but you know what, I think cakes are like Halloween costumes, they are so much better when they are homemade with a bit of thought and humour than some generic outfit you can buy in a joke shop or on the internet. So I went with the book cover which seemed really do-able and more true to the story of the book. In researching this cake I learned that the pawn and queen chess pieces are a metaphor for Bella's progression in the series, moving from being a weak character to finally being the strongest, 'the queen'. I can almost feel the eyes rolling as I mention 'researching' the cake!

For the Devil's Food Cake

4 tbsp cocoa powder
175ml boiling water
1 tsp bicarbonate of soda
100g dark chocolate
125g unsalted butter, softened
350g caster sugar
2 large free range eggs
1 tsp vanilla extract
300g plain flour
125ml soured cream

For the Buttercream
200g butter
75g butter, softened and diced
1 tbsp milk

Preheat the oven to 180o C. Put the cocoa into a heatproof bowl and mix to a smooth liquid with the boiling water. Stir in the bicarbonate of soda and leave to cool.

Break up the chocolate into another heatproof bowl and either melt over a pan of steaming water or, if you're lazy like me, in the microwave 20 seconds at a time, stirring all the time.

Beat the butter and sugar for 4-5 minutes until very light. There is quite a lot of sugar in proportion to the butter so give it a good beating to break it down. Beat the eggs and vanilla with a fork until broken up, then add to the butter mixture a tbsp at a time, beating well after each addition.

Sift the flour, then fold in in 3 batches, alternatively with the soured cream. Mix the cocoa liquid into the melted chocolate, then fold into the cake mixture. When thoroughly combined- no streaks visible- divide the mixture between 2 x 20.5cm sandwich tins, greased and lined with baking paper.

The book says to bake for 30 minutes until risen and just firm and a skewer inserted into the cake comes out clean, but I needed to bake for about 50 minutes. It could be my oven so bake for 30 minutes and test, but be aware that the cake may need more baking.

Run a bladed knife around the inside of the tins to loosen the sponges and turn out on a wire rack and cool. When cold slice horizontally. Make up some buttercream (I tinted it red) by creaming the icing sugar, butter and milk. Sandwich the cakes together with the buttercream.

To decorate mould the queen and chess pieces out of ready roll icing having tinted red and white respectively.

The chessboard takes a bit of planning. Measure the face of the cake and divide into equal squares, you may need to leave a border either side. My cake face was 23cm so I left a 1cm border each side and then split the 21cm into 7 x 3cm squares. Melt 5 tbsp of apricot jam and brush the cake with it. This will help the icing to stick to the cake.  Cover the cake with white ready roll icing rolled out quite thinly. Measure the cake face and allow for icing to drape over the side. I tied a ribbon around the edge of the cake so I didn't need the icing to totally cover the sides- a neat cheater's trick! Smooth over with your fingers to smooth out bubbles.

Cut out the black squares according to your calculations- mine were 3cm squared. Use a ruler to set the squares on the cake, leaving gaps for the quite checkerboard squares. I didn't need to stick the squares down, I found they stuck themselves. Arrange the queen and pawn and tie the red ribbon around the cake.

Tuesday 4 October 2011

Pork and Apple Pie

A request was made by a certain sister (let her be known Ms Lauderee Macaroon even though she has never eaten one) to make 'pie' for her homecoming. I provided the pastry and we collaborated on the filling. Savoury pies are not something we were brought up with and still consider to be a culinary treat- as we should! I really like this recipe, the cider and orange adding lovely tones to the sauce underneath the pastry. We used pork fillet instead of the boneless leg and reduced the cooking time of the filling to 1 hour before putting on the lid.

Take from the Great British Bake Off Cook
800g boneless leg of pork diced
2 tbsp plain flour
2-4 tbsp veg oil
2 medium onions thinly sliced
3 celery sticks sliced
2 garlic cloves, chopping
400ml dry cider
finely grated zest of 1 orange
3 eating apples peeled and thickly sliced.
1 quantity of rough puff pastry in the previous post.

For the filling
1. Preheat the oven to 170oC. Put the pork into a bowl, sprinkle with flour and a little pepper and salt and toss to coat. Heat 2 tbsp of the oil in a large casserole dish. Working in batches, add the pork and quickly brown, adding more oil as needed. As each batch is browned, remove from the pan to a large plate.

2. Add the onions, celery and garlic and cook gently for 10 minutes until golden. Add the cider, bring to the boil and return the pork to the pot with the orange zest and apples. Stir and add a little salt and plenty of black pepper. Transfer to the oven and cook for 2-2.5 hours until the meat is very tender.

3. Take the pot out of the oven, adjust seasoning if needed and reduce to the thick gravy over the hob if it looks a bit watery. Leave to cool in a large 1.25-1.5L pie dish.

4. Roll the pastry out around 7cm larger than the pie dish. Cut off a strip from around the oval, around 1cm wide and long enough to fit all around the rim of the dish. Dampen the rim with water and press the strip of pastry onto it, joining the ends neatly. Roll the oval around the rolling pin and lay gently over the pie dish. Make a slit in the pastry with a sharp knife to let the steam out. I use the back of a fork to press around the edges of the pastry which seals it and stops the sauce bubbling out over the edges.

5. Chill the heat while preheating the oven to 200oC. Brush with beaten egg and bake for 15 minutes then reduce temperature to 180oC and bake for a further 20-25 minutes or until crisp and golden. Serve hot with potatoes and veg of choice.

Rough Puff Pastry

I have a dirty secret- I have never made puff pastry from scratch. All that rolling and folding and chilling made me stretch for the easy option in the ready-made-pastry isle of the shop. But yesterday I tackled the white pastry elephant in the room. I just didn't have the time (read patience) to make proper puff pastry so I gave 'rough puff' a go. I wasn't going to put my attempt on the blog, it worked out pretty well but not the perfect glossy finish we're used to looking at in cookery books. But hey, I set up the blog in the interests of collective learning and have never claimed to be anything but an amateur. Hopefully y'all can learn from my mistakes.

For the pastry (Taken from the Great British Bake Off book) 
225g plain flour
1/4 tsp salt
125g unsalted butter, chilled
about 125ml icy water
1/2 tsp lemon juice

I think the first place I went wrong was not having the butter cold enough. The big secret to this pastry is to have all the ingredients as cold as possible, you don't want the butter melting as this will ruin the 'puff' effect. I put my butter in the fridge and then diced it quickly, touching it with my hands as little as possible. Still I think it would've been wiser to put the butter in the freezer for half an hour before making the pastry.

Sift the flour and salt into a mixing bowl.  Cut the cold butter and gently stir into the flour with a round-bladed knife - just until the butter cubes are covered in flour, they should not be broken up.


Combine the icy water and lemon juice and stir enough through to bind the dough- it should be lumpy, soft and moist but not sticky or wet. Less stirring is more here.

Turn out the dough on a lightly floured worktop and shape into a brick. Using a floured rolling pin, roll out the dough- rolling away from you- into a rectangle 45cm x 15cm. Fold the dough into three like a business letter, fold the bottom third of the dough up to cover the middle third, then fold the top third down to cover the other two layers (see pictures). Gently but firmly seal the edges by pressing down with a rolling pin. This is the first 'turn'. Wrap the dough in clingfilm and chill for at least 15 minutes.


I think I would have gotten a better puffiness if I squared the edges of the dough up so that it was a perfect rectangle and folded in on itself neatly.


Repeat this folding process three times more, allowing 15 minutes chilling between each 'turn'.
Perfect as a lid on savoury pies- especially the pork and apple pie that is to follow!