Wednesday, 30 January 2013

Carrot Cupcakes


One crosses a line when one starts making vegetables out of sugar paste. There is something insanely wrong about it. You're taking something healthy and natural and replicating it with pure sugar and food colouring. But boy do they look cute! In fact they are so shiny and orangey that they make me want to eat actual carrots... Oh my, maybe I've figured out the greatest parenting trick of the 21st Century! Make little sugar replicas of all the good stuff they won't eat so that they start feeling positive when they see the real thing. What is that called - positive reinforcement? Reverse psychology? Brainwashing? I'll stock up on sugarpaste and start clinical trials right away...

Carrot cake is a sort of alien in the cake world. We have accepted it's weird vegetable-in-cake premise much more readily than say, beetroot which is also delicious but which people would instantly turn their nose up at. It is paving the way for vegetable domination of the cake world, one cafe at a time...

I don't like using oil in cakes period because I can always taste the oil. I know that so many famous bakeries and bakers use oil in their carrot cakes, in fact I was hard pressed to find a recipe that didn't, so I may be the only one who finds that greasy after taste even while using sunflower oil which is recommended by BBC Good Food as an oil to use in baking. It's butter all the way for me and even better this recipe from (my hero) Bravetart uses brown butter which I have adored since I used it to make pancake muffins here. It adds a dark caramel type flavour to the butter.

Makes 18 large cupcakes
200g unsalted butter
175g caster sugar
 85g brown sugar
1/2 tbsp baking soda
3/4 tsp baking powder
3/4 tsp salt
1 tsp cinnamon
3/4 tsp ginger
1/4 tsp cloves, mace and nutmeg each
3 eggs
200g wholemeal flour
1/2 tbsp vanilla extract
400g grated carrot
200g nuts (like pecans, pistachios or hazelnuts)

1. Put the butter in a small pan and melt gently. Once melted jack up the heat to medium and allow to sizzle until the bottom of the pan goes slightly brown and a foam forms. Allow to cook until the pan goes silent and there is a caramel smell. Remove from the heat and allow to cool.
2. Beat the eggs, sugars, baking soda, baking powder salt and spices in a bowl for 4-5 minutes until the eggs have lightened and coloured. Mix in the vanilla and with the beater going pour in the butter in a steady stream.
3. Pour in the flour all in one go and fold gently until just combined. Add the carrots and nuts and barely fold in.
4. Make at 180oC for 15-18 minutes until a skewer comes out clean.

For the mini carrots I used tinted sugarpaste and angelica for the greens.

Tuesday, 29 January 2013

White Chocolate Mousse with Creme de Cacao Liqueur


I got my lower wisdom teeth out last Friday and boy has it been unpleasant. My cheeks are still blown up like a little fed up pug and I'm incapable of chewing or talking comfortably. I enjoy being creative with food but even with a little flair I am getting fed up of soup, smoothies and mashed potatoes. Missing a delicious roast pork dinner on Sunday was nothing short of a travesty but there was no way I could miss Sunday dessert. Sunday dinner is my chance to spend a bit extra on ingredients and on time and to produce something delicious, special and sometimes a bit showy-offy.

But as it turns out desserts the texture of baby food can be delicious too! I added Creme de Cacao Liqueur to give a deeper flavour beneath the white chocolate. Sometimes I find white chocolate flavoured mousses and cheesecakes can be sickeningly sweet without some sharpness to provide contrast like a coulis or dark chocolate layer. The booze is that contrast here but if you are a white chocolate fan or are serving for teetotallers/children omit the 'grown up juice' and beat in only one egg yolk.

Note there are raw egg yolks in this so it may not be suitable for pregnant people or people with concerns about raw eggs. Sure hasn't killed me yet....

Adapted from Joy the Baker

150g white chocolate, broken into pieces
2 tablespoons of unsalted butter
1 tablespoon of water
2 tablespoons of Creme de Cacao Liqueur or other white chocolate liqueur
275ml single cream
pinch of salt
2 teaspoons of icing sugar

1. Put white chocolate, butter and water in a pan and heat gently until the chocolate is almost dissolved. Take off the heat and stir until all the chocolate is melted and the butter is combined with the chocolate. It will keep trying to separate so keeping stirring every now and then until it cools.
2. Beat the cream, salt and icing sugar until soft peaks form.
3. When the white chocolate mixture is cooled, beat in the liqueur and egg yolks until no traces of egg yolk remain. Then fold the white chocolate mix into the beaten cream. Mix gently with a big spoon until just combined. You don't want to deflate the cream.
4. Spoon into ramekins, little serving dishes or for the novelty sterile jars. Leave to set for at least 2-3 hours or preferably overnight.

Decorations here were simply made with piped melted chocolate.


Saturday, 26 January 2013

Cinnamon Sugar Doughnuts


I have decided to partake in the AlphaBakes challenge hosted by The More Than Occasional Baker and Caroline Makes blogs. Alphabakes is a fun challenge where the baker must submit an entry based on a random letter picked for the relevant month. This month's letter is D. Doughnuts make me think of carnivals and fairs in the 1940's where the whole town flocked to eat candy floss, doughnuts and other sugary delights, watch the glittering show with runaway performers and pay a couple of pence for the dizzing heights of the Ferris wheel... It seems that no one makes them at home any more, which is a real shame. They don't skimp on calories or sugar but they sure are naughty delicious. My favourite is a simple cinnamon and sugar coated ring, although you could ice these doughnuts or pipe them with chocolate ganache, jam or apple sauce. 


Paul Hollywood Recipe


For the doughnuts
500g/1lb 2oz strong white flour

50g/2oz caster sugar

40g/1½oz unsalted butter

2 free-range eggs

2 x 7g sachets instant yeast

10g/¼oz salt

150ml/5fl oz warm milk

130ml/4½fl oz water

For the coating
100g caster sugar 
3 tsp cinnamon

1. Put flour and salt in a bowl and mix in the butter with your fingertips until the mix resembles breadcrumbs. 
2. Then add yeast and stir. Pour in the rest of the ingredients (save 1fl oz of the water) and mix to a floury dough with your fingers. 
3. Add the rest of the water and bring the dough together. It may be sticky. Knead in the bowl for four minutes then take out onto a floured surface and knead for another 10 minutes. 
4. Leave to rise for at least 1 hour in a warm place covered with clingfilm.  
5. After an hour punch the dough back, form into 12 equal sized balls. Flatten slightly, then push a whole in the centre of the ball. Put your index finger through the hole and whirl the dough around your finger until quite a large hole is formed. Bear in mind the next rise will make the hole smaller. 
6. Do this with all 12 balls then leave to rise for another hour covered with clingfilm. 
7. Heat sunflower or veg oil to 180oC in a deep fat fryer or deep saucepan. Have your sugar and cinnamon on a large plate ready. Bake the doughnuts for 2-3 minutes on each side until golden. Toss in sugar straight from the fryer.


Friday, 25 January 2013

Pistachio and Rose Macarons


Ooops there was a minor typo on the initial buttercream recipe regarding the pistachio quantity! Sorry!

Oh dear. I am kind of in love with making macarons right now. Like having macaron related dreams and watching the Da Vinci Code movie just so I can get that little bit closer to the home of macarons, Paris. (BTW Audrey Tatou makes me want to learn French. It is just a pity that this girl crush didn't motivate me when I was actually learning French in school - seriously how cute is she? They should play that Chanel ad she is in to teenagers).

My older sister should have been born into a rich family in the Upper East Side of New York because her taste in almost everything is decidedly fancy. She has an exam this week and a macaron care package seemed a way to A. Salvage my baking reputation after two disasterous batches I made her previously, B. Indulge in my macaron obsession and C. Cheer her up with her favourite treats. The flavour combo was her choice- she choose pistachio and being a messer I decided to add rosewater for an underlying floral scent.

In the interests of learning here are my notes on macaron baking: 
- Like I said in my initial post I used Bavetart's recipe.
- This time around I had a less successful batch with around 4 on each tray cracking on the top. I think that I beat my meringue too much as I kept adding more colour to get the desired colour and beating. Next time I would add the colour a minute sooner. Also the first time I left out her last minute of beating and that batter was more successful.
- Have all your equipment ready.
- I used the bottom of an egg cup to trace the shape I wanted my macs on the baking paper.
- You should bake macs on the lower third part of your oven.
- Some of these browned slightly on the top, even after only 15 minutes of baking even though the last batch didn't at all and I followed the exact same procedure! Very annoying and mysterious. I think next time I will give them 13 minutes and then check to see if they are done.
- If the batter is making, for want of a better analogy (and there is want) 'farting' noises as you pipe it out then you should return the batter and mix it another few strokes because it has too much air and will crack. I make this mistake.
- I sieved the almond and icing sugar on top of the meringue before mixing in as I felt it would doubly ensure no lumps of dry ingredients.
- The colour will get paler as the macs cook so make them slightly darker than you wish the end result to be.
- Pipe the macs down rather than from the side like choux pastry and she will ensure they are all round and not oval.
- If the peaks remain on your macs after you pipe and tap then your batter is undermixed.

These are just things I found out by trial and error, by no means professional instructions.

For the buttercream
85g caster sugar
4 tablespoons of water
150g butter, softened but not runny
2 egg yolks
1/2 tsp rosewater
50g pistachios, finely chopped or ideally ground in a pestle and mortar


1. Beat egg yolk briefly with an electrical beaters until light in colour.
2. Put the sugar and water in a saucepan and melt over a gentle heat. Do not boil. When melted bring rapidly to the boil and boil until the syrup reaches 110oC/225oF on a sugar thermometer. If you don't have a thermometer then test the syrup by flicking a string of it into a bowl of cold water. When you attempt to pick it back out it should form a 'ball' between your fingers that is soft- this is aptly named 'soft ball stage'. This will take 2-3 minutes approx.
3. While beating the egg pour in the syrup in a gentle stream. Beat for 4-5 minutes until the mixture becomes very thick and completely cold.
4. Gradually beat in the softened butter cube by cube and beat for another 2-3 minutes until there are no lumps. Add the rosewater and beat for another minute. Stop the beaters and fold in the pistachios. Pipe onto the macarons for a clean finish.


Marble Bundt Cake


I like snow. When I have no where to go and no intention of leaving the house that is. Otherwise it is a complete pain in the derrière.  I won't forget cycling to an exam in a blizzard in final year or spending five hours on a bus to get home from college for Christmas- a journey that usually takes one and a half hours. But when you are aren't inching cautiously around in a car you can enjoy the benefits of snow. Firstly the panoramic snowy scenes and the satisfying crunch of the snow beneath your shoes. Secondly the freezing weather provides an excuse to stay inside, put on the fire and eat plenty of cake, bundt cake to be exact.

This marble bundt is what Nigella would call a 'spruced up' simple Victoria sponge.  The result is a pretty buttery sponge that is easy peasy and would impress the heck out of guests if placed on a table as an after party treat.

But first a few snaps of an Irish winter.


For a 1L Bundt Tin
225g butter or margarine softened
225g caster sugar
4 large eggs
225g self raising flour sifted
1 tsp vanilla extract
2 tablespoons of milk
2 tablespoon unsweetened cocoa dissolved in 3 tablespoons of boiling water, allowed to cool

To prepare your bundt tin- brush with melted butter or spray oil then dust lightly with flour. Knock out the extra flour by giving the tin a whack upside down over the sink. Don't forget to brush the inside ring! Place in the fridge for 20 minutes before putting the batter inside.

1. Beat sugar and butter with an electric mixer until soft and light in colour- 5-6 minutes.
2. Add the egg one at a time with a heaped tablespoon of the flour. Beat well after each addition.
3. Fold in the flour gently, or beat on slow with the beater.
4. Divide the batter in half roughly. Into one half mix the cocoa powder gently. To the other add the milk and vanilla and mix in well.
5. Bake for 30-40 minutes at 180oC until a skewer comes out clean. All


Wednesday, 23 January 2013

My Baking Everest - French Macarons and French Coffee Buttercream


Macarons are in baking vogue right now. The crown jewel of french baking, they colourfully adorn pattisserie windows and counters in expensive department stores like edible rainbows. But you only have to do a quick 'macaron troubleshooting' google search to appreciate the gargantuan number of problems bakers face making macarons. Making macaron batter even has its own word-'macaronage' and macaron anatomy is more troublesome than Grey's.

From seriouseats.com

I've tried to make them numerous times before- three times to be precise. I am not used to being a complete disaster in the kitchen and frankly my pride couldn't take another shambolic attempt. It was time to knuckle down to some macaron homework.

There are a number of great sites that I read and picked up hints and tips. I finally settled for the recipe on Bravetart. Stella has been named one of America's top pastry chefs by Food and Wine Magazine so clearly she has the credits behind her. But what I like about her even more than her training is that she takes a complete no nonsense approach to baking macarons. She rubbishes all the myths and murk behind macaron baking (like 'ageing' egg whites, letting them rest etc.) with her simple, easy to follow instructions. And her recipe 100% worked for me, a serial macaron killer.

I didn't add any colour or flavouring to the macarons this time because I wanted to appreciate the elementary aspects of the process first. This batch isn't perfect; I think it needed a little more mixing but I can't wait to experiment with colours and flavours now that I feel a (little) more confident about the basics.


Also check out
http://notsohumblepie.blogspot.ie/2010/08/macaron-troubleshooting-new-recipe.html
http://www.eatlivetravelwrite.com/2011/04/how-to-make-macarons-whats-working-for-me-right-now/

Good luck!!


For the Buttercream - From Great British Bake Off book- Enough to sandwich 40 macarons

This french buttercream is less tricky than the illustrious swiss meringue buttercream but just as silky smooth and decadent.

2 egg yolks
85g caster sugar
4 tablespoons of water
150g unsalted butter softened and cubed
2 tablespoons of dark coffee

1. Beat egg yolk briefly with an electrical beaters until light in colour.
2. Put the sugar and water in a saucepan and melt over a gentle heat. Do not boil. When melted bring rapidly to the boil and boil until the syrup reaches 110oC/225oF on a sugar thermometer. If you don't have a thermometer then test the syrup by flicking a string of it into a bowl of cold water. When you attempt to pick it back out it should form a 'ball' between your fingers that is soft- this is aptly named 'soft ball stage'. This will take 2-3 minutes approx.
3. While beating the egg pour in the syrup in a gentle stream. Beat for 4-5 minutes until the mixture becomes very thick and completely cold.
4. Gradually beat in the softened butter cube by cube and beat for another 2-3 minutes until there are no lumps. Add the coffee and beat for another minute.

Monday, 21 January 2013

Challah bread

I have found tastespotting again and my foodie senses are tingling with excitement over a few new blogs I have found through it. Baker's Royale take indulgence cute baking to an extravagant level. I NEED to try Slutty Cheesecake BarsZebra Bundt Cake and Double Chocolate Mocha Cupcakes among many others.

The Cake Hunter is another stellar addition to my bloglovin account and it is through Sophie's blog that I found this recipe for Challah bread, originally belonging to the Smitten Kitchen. I've been drooling over her Chocolate Torte with Coffee Whiskey Mascarpone and her version of the GBBO challenge Fraisier Cake.

Challah bread is a Jewish yeast bread, traditionally eaten on the Sabbath and special holidays and is considered to be an important way for followers to connect with God. The bread is braided and each one of the six sections represent a different tribe of Israel. It is enriched with eggs and so rises slowly giving greater flavour. To me it is a meeting between a brioche and a white loaf. It is less sweet than a brioche but with a similar soft and delicate texture. I used it to make a chocolate bread pudding so I didn't sprinkle it with seeds as is commonly done. Do so if you wish or knead in 70g raisins or chocolate chips. Or use it to make French toast or spread with jam and butter for a delicious tea time treat.

This is the first time I plaited a loaf BTW. It is a little bit uneven but I was happy for a first try! I have a crazy desire to plait every loaf I make from now on!


Makes 2 large loaves
1 1/2 package fast action dried yeast (11g approx)
1/2 cup caster sugar
5 eggs
1 tsp salt
8 cups strong white flour (around 1kg)
1/2 cup olive or veg oil

1. Whisk the yeast, 1 3/4 cup lukewarm water and 1 tablespoon of the sugar until the yeast dissolves.
2. Add the oil and whisk then beat in the eggs one at a time. Finally beat in the sugar and salt.
3. Gradually add the flour until you have a smooth, not too-sticky dough. You may need to add up to 1/4 cup of extra flour if the dough is too sticky to handle.
4. Knead for 5-10 minutes by hand until the dough is smooth and elastic. Clean out the bowl and oil with 1 tsp oil. Put the dough back in, cover with clingfilm and allow to rise for 1 1/2 hours.
5. Punch the air out of the dough after 1 1/2 hours and allow to rise for another half hour covered. After this you can knead in the raisins or chocolate chips.
6. After the half hour turn out and split in 2. Roll one half into 6 separate balls.
7. Roll each 6 balls into 12 inch long sausages. Place the sausages parallel on a floured counter. Dampen the ends of the sausages on one side with a little bit of water and pinch the ends together. This will be the start of your plait.
8. Now to make your plait! Follow the instructions carefully. The plait may look like a mess but it will come together if you are careful to follow the instructions.

  1. Move the outside right strand over 2 strands. 
  2. Then take the second strand from the left and move it to the far right. 
  3. Take the outside left strand and move it over 2. 
  4. Move second strand from the right over to the far left. 
9. Start over with the outside right strand. Continue this until all strands are braided. For a straight loaf, tuck ends underneath. For a circular loaf, twist into a circle, pinching ends together. Make a second loaf the same way. Place braided loaves on a greased cookie sheet with at least 2 inches in between.
10. Brush with beaten egg. Either freeze the loaves at this stage or allow to rise for another hour covered.
11. Preheat the oven to 190oC/375oF.
12. Brush the loaves again with egg. Bake for 30 -40 minutes until golden and the bread is hollow when you turn it over.
13. If freezing defrost for 5 hours at room temperature before baking.


Friday, 18 January 2013

Avocado Chocolate Cupcakes with Cream Cheese Chocolate Frosting


This week I started yoga classes and ate quinoa 'superfood' for the first time and I am feeling rather proud of myself. This wholesome living is, of course, completely isolated from an incident involving a tin of danish butter cookies and my heartfelt late night goodbye to Friday Night Lights, a TV show I become quietly addicted to two months ago. ('Hey Y'all' to all the Tim Riggins fans out there). In my defence the cookies come in this adorable tin with toy solider design and are butter-meets-sugar heaven. My favourites are the squares ones covered in granulated sugar... Anyway like I said this has nothing to do with that

Vegetables in our sweet stuff is a new major food trend. I like the thought of healthy-ing up my baking and messing around with flavours at the same time. I tackled beetroot chocolate cake first here and now it is my go-to crowd pleasing chocolate cake. Now I am going all the way and cutting out butter and eggs with these vegan avocado cupcakes. I am not a fan of using oil in baking, I think it leaves an after taste even when using vegetable or sunflower oil, but you only need 2 tablespoons here so there is no impact on taste. The moist avocado acts as a butter substitute giving a moist light crumb. 

You definitely wouldn't know there was avocado in them.  Probably best to only tell the guests after they leave their cupcake cases like this:

From Joy the Baker 
1 1/2 cups plain flour sifted 
1/4 cup cocoa powder 
1/4 tsp salt 
1 tsp baking powder 
1 tsp baking/bread soda 
1 cup caster sugar 
2 tablespoons of vegetable oil 
1/4 cup mashed ripe avocado (around 1/2 medium sized avocado) 
1 cup water 
1 tablespoon of white vinegar 
1 tsp vanilla extract 

1. Sift the flour, cocoa powder, baking and bread soda and salt into a bowl. 
2. In a separate bowl mix sugar, oil, avocado, water, vinegar and vanilla extract. 
3. Add the flour mixture to the avocado mixture and mix well to ensure there are no hidden pockets of flour. 
4. The batter will be very light. Fill the cupcake liners to over 2/3's full. The batter will not rise too much. 
5. Make for 18-20 minutes at 350oF/180oC until a skewer comes out clean. Let cool for ten minutes once out of the oven then transfer the cupcakes to a wire rack to cool. 

This cream cheese chocolate frosting is moreish and devine and a big winner with those who find normal buttercream too sweet as it is made with unsweetened cocoa powder. 

For the frosting: Frosts 12-14 cupcakes 
From Joy the Baker cookbook

100g cream cheese 
1/2 cup (100g) unsalted butter 
1/8 cup cocoa powder unsweetened (I use Bourneville) 
pinch of salt 
1 cup icing sugar sifted 
1 tsp vanilla extract 
1 tsp milk 

1. Allow the cream cheese and butter to soften at room temperature for 1-2 hours. 
2. Beat the cream cheese allow with an electric beater until soft and pliable. Add the butter and beat until the butter is broken down and mixed with the cream cheese. Add the cocoa powder and beat for 30 seconds until incorporated. 
3. Add the salt, icing sugar, vanilla extract and milk. Beat until well combined- 3-4 minutes. 


Tuesday, 15 January 2013

Spiced Poached Prunes


I'm obsessed with star anise right now. It is available in good supermarkets and asian food shops sell it cheaply. It's flavour is liquoricy but not with that nasty harsh aftertaste of liquorice candy, it is more subtle and warm. I've been making hot chai lattes these last few days, they are perfect for these chilly nights. Use the link above and make with hot instead of cold milk. The spices are warm and comforting, the milk sends you softly to the land of nod. 

So I am bringing the winning combination to breakfast time with these delicious soft prunes with spicy juices. Amazing with natural yogurt as an anytime snack. I ate it with overnight porridge this morning, recipe to follow!


Adapted From Neven Maguire's Cookery Collection
350g pitted prunes
25g caster sugar
2 whole star anise
1 cinnamon stick
1/2 vanilla pod split

1. Put sugar and 275ml water in a saucepan and melt over a gently heat. Add the spices. Bring to the boil and tip in the prunes. Simmer gently for 5 minutes.
2. Remove from the heat and allow to cool in the juice.
3. These will keep in the fridge in a lunchbox for 3 weeks.


Malibu and Vanilla Bean Creme Caramel

Caramel is my adult Regina George. If you don't get the Mean Girls reference, caramel is that pretty girl in school that was mean and you hated but secretly you wanted to be her friend and was in awe of her amazing hair/skin/figure and the way guys just fell for her. I love caramel but I fear it. Sometimes it is sweet to me. It colours perfectly and smells devine. Sometimes it turns on me like a snake and crystallises into a white rock hard mess. But I can't walk away because it tastes so damn good... 

Practice will make perfect.... Right?

Creme caramel is a classic baked custard dessert. This version is fancied up with the addition of malibu rum in the caramel and vanilla beans in the custard. 


From Neven Maguire 'Home Chef', makes 7/8
400ml can coconut milk
100ml cream
1 vanilla pod, split with seeds scraped open
4 eggs plus 3 egg yolks
100g caster sugar

For the caramel
150g caster sugar
100ml Malibu


1. First make the caramel. Place the caster sugar in small, heavy based, not non-stick saucepan with 50ml water. Bring to the boil stirring so that the water and sugar are mixed together. Reduce the heat to a simmer and stop stirring once the sugar has dissolved. Otherwise the sugar will crystallise.
2. Continue to cook for 10 minutes at least until the syrup has turned a dark copper colour. If you have a sugar thermometer this is around 320-350oF/160-176oC. Take off the heat.
3. Pour in 100ml water into the hot caramel to prevent it browning further and burning. The mixture may splutter be careful. The caramel may go funny and lumpy at this stage. Add the malibu and return to the heat until the caramel has a thick consistency, like honey.
4. Divide the caramel among 7/8 ramekin dishes or small teacups that have been lightly oiled with sunflower oil and kitchen paper.
5. Place the coconut milk, cream and vanilla pod in a saucepan and bring to the boil. Turn down the heat subsequently and allow to cool slightly for 5 minutes so that the eggs don't scramble.
6. Whisk the eggs, egg yolks, caster sugar and vanilla seeds together until incorporated. Pour the hot milk mixture in in a steady stream whisking all the time.
7. Pass the mixture through a sieve into a jug. Carefully pour on top of the caramel filling each ramekin to the rim.
8. Bake at 140oC for 30-40 minutes until set to the touch but still a little wobbly in the centre, like jelly. The outside should be fairly firm.
9. Leave in the fridge for at least 2-3 hours but preferably overnight.
10. To serve run a sharp knife around the outside of the creme caramel. Place a bowl on top of the ramekin. Keep the ramekin/bowl at your chest level, then with your fingers on top of the ramekin sharply lower the ramekin/bowl to waist level until you hear the plop of the creme caramel out on the bowl. This may take a few tries of sharp movement.


Monday, 14 January 2013

Spinach, banana, clemintine smoothie

Anyone else a little bit scared of health food shops? I am sure I am alone in this (and other) peculiarity. Its the smell that gets me first and I'm pretty sure this is a common enough smell in health food shops. It is strong and strange, a musky smell mixed with what I would imagine to be the vapours of a deep well mine, soaked with minerals made from long dormant lava. You get used to it after a few minutes of rooting around but the initial blow as you enter the shop sends me reeling slightly.

Then my ignorance about wholefoods shows me up. I don't know what goji berries are, what fish oils are for or how to take macra powder. I have a rough aspiration of having the energy of a young cheetah and know that I should take something for my rubbish joints but have no clue of the product that is going to help me. The sales assistant is helpful but I always feel intimidated and out of my depth.

Joy the Baker had a post recently on this spinach smoothie which I have tweaked slightly. She mentioned chia seeds as a happy health food addition and after a bit of googling I learned that they are good for energy, boosting your metabolism (equals more cake) and full of antioxidants (equals good skin and hair). Milled linseed is available in most supermarkets and is also a good source of omega 3.

The clemintine orange adds a sweet hint behind the stronger spinach and peanut butter flavours.

Ingredients: Makes 1 large or 2 small smoothies
1 clemintine orange peeled
1 1/2 cups spinach
1 banana
1 tbsp peanut butter
1 tsp honey
1 cup soya/almond or cows milk
1/2 cup natural yogurt
1 tablespoon of chia seeds (optional)
1 tablespoon of milled linseed (optional)


1. Put the spinach, banana, peanut butter, honey, clemintine and milk in a food processor or deep bowl. Blitz for 30 seconds smooth. 
2. Add the natural yogurt, chia seeds and linseed if using and blitz for 10 seconds until incorporated. 


Friday, 11 January 2013

Cranberry and Hazelnut Bread


I love magic. I love Harry Potter and Lord of the Rings, and all the other witches and wizards of childhood imagination. I wish I went to Hogwarts, I wish I could say cool things like 'wingardium leviosa'. I wish I could have a staff like Gandalf the Grey/White. I wish I had a 'family secret' like Sabrina the Teenage Witch. I wish I could fall down a hole and go to an amazing tea party with a Mad Hatter like Alice. 

Sigh...

For today I think I will settle for the magic that happens when bread dough fills up with air and puffs up like a proud chest when nestled in a warm place. Because it is a kind of wonder and I still feel a little in awe of it....

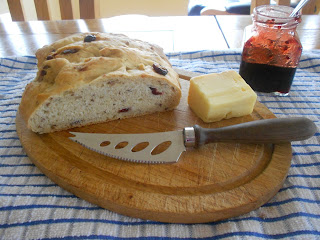
This bread is delicious topped with good cheese and red onion marmalade. The cranberries are sweet with a tart after-bite and the hazelnuts provide a warm crunch. It is also great toasted and spread with butter and/or jam. 


Adapted from Neven Maguire's Home Chef

Makes two medium sized loaves

550g bread flour
1 tsp salt
50g butter, diced and chilled
7g sachet easy blend dried yeast
70g chopped hazelnuts
80g dried cranberries

1. Sift the flour and salt into a bowl. Rub in the butter until the mixture looks like breadcrumbs. You can do this with your fingers and thumb or with an electric mixer.
2. Stir in the yeast, cranberries and hazelnuts until everything is evenly combined.
3. Make a well in the centre of the dry ingredients and pour in 350ml/12fl oz of LUKEWARM water. If the water is cold it will work against the yeast and stop the bread rising.
4. Quickly mix until the water is incorporated and then turn knead for 10 minutes by hand or 5 minutes in a food processor with the dough hook. Place in a bowl that has been oiled with a dash of sunflower/olive oil and cover with a damp tea towel or clingfilm. This is to keep in the heat so the yeast will rise more efficiently.
5. Leave in a warm place for at least an hour, an hour and a half if you have time.
6. Punch the air out of the dough with a clench fist then divide it roughly into two round loaves. Place on a baking sheet lined with baking paper and cover with a damp tea towel and allow to rise again for about 30 minutes.
7. Preheat the oven to 220oC. Remove the tea towel and slash the loaves with a sharp knife. Put the loaves in a middle shelf. Bake for 10 minutes then reduce and bake for another 25 minutes roughly. Turn the loaves around halfway during baking for even baking.
8. The loaves are done with they sound hollow/light inside when rapped by your knuckle. They should be golden brown on top.
9. Allow to cool before cutting.

Wednesday, 9 January 2013

Natural Pink Raspberry Buttercream Icing


I never think that a drop or two of food colouring when I make my icing is going to harm anyone in the long term, but in an age where we are increasingly concerned about food additives, colours, e-numbers etc. etc. in our diets it is worth looking at natural way of adding colour to our baking. Berries are a great source of pink/red ink and also add a beautiful tang to cut through the sweet buttercream. It is easily done by adding shop bought unsweetened raspberry coulis or making your own which you could enslave children to do it is so simple. To me this buttercream tastes like those long cylindrical raspberry ice-lollies of childhood. Were they called Milky Moos?

For the raspberry coulis
1. Defrost 55g of frozen raspberries with a tsp of water for a couple of hours. When softened they will give out plenty of water. Mash with a fork. If using fresh raspberries you may need to add an extra 1-2 tsp of water.
2. Press the pulp through a fine sieve to get rid of the seeds.

Buttercream
75g butter softened
200g icing sugar sieved
2 tablespoons of raspberry coulis

1. Beat the butter and icing sugar together until the butter is a crumbed texture.
2. Make sure the coulis is warm/at room temperature. Heat in the microwave for 10 seconds if cold. Otherwise your buttercream may curdle.
3. Add the coulis and beat the buttercream for 3-4 minutes until lighter pink and there are no longer any lumps.

Tuesday, 8 January 2013

Courgette, Potato and Parmesan Pancakes


Things I learned at New Years: 
A. Don't put on red lipstick while drinking and without a mirror. Its a classy look but only when the lipstick is actually on your lips and not the surrounding area. 
B. Don't let yourself be filmed while dancing to Gangnam Style however hilarious the idea may seem at the time. You are not a dancer nor can you ride a horse. Both of these facts thereby disqualify you from conducting yourself with dignity. 

In other news Happy New Year!! I'm trying to get more veggies in my diet and these 'pancakes' (or I would probably call them rostis) are perfect for a tasty lunch or with a salad a light dinner. 

Slightly Adapted from Joy the Baker cookbook 
1/4 cup finely diced white onion 
1 garlic clove finely chopped 
2 cups grated courgette 
2 cups grated potato
small handful of parmesan cheese grated
1/2 teaspoon of salt 
2 large eggs 
1/3 cup flour 
1/2 tsp baking powder 

1. Saute onions gently over medium heat. Add the garlic when the onions are translucent. Shred potatoes and courgette with a box grater or a julienne (a grater like instrument that cuts veg into thin matchsticks, very handy if you make potato chips regularly or potato gratin). 
2. Season and then add the egg and parmesan. Mix until combined. Then finally fold in the flour and baking powder. 


3. Heat a frying pan with another tablespoon of oil. Shape into patties or use culinary rings/biscut cutters if you have then. No worries if you don't, just make sure that the pan is pretty hot before you put the pancakes on so that they hold their shape and don't fall apart. If unsure try flicking some batter on the pan. If it sizzles the pan is hot enough.

3. Fry on both sides until golden brown- about 3 minutes on each side. Serve with creme fraiche and grated parmesan (if your trying to be fancy).


Sunday, 6 January 2013

Easy and Cheap Teddy Bear Cake Topper Tutorial

I have gone off sugarcraft recently. I think that the styling techniques of the likes of Donna Hay (thanks Zita!), sprinklebakes.com or Lily Vanilli provide a more more spectacular way of decorating cakes. They use natural ingredients, flowers and petals or chocolate to imaginatively give a modern twist to cake decorating. I also admire the fact that this type of decoration can add to taste and texture as well reflecting the flavours within. 

All this being said, recently I was asked to decorate a Christening cake and I do think when it comes to childrens' cakes sugarcraft is probably the way to go. Fun, colourful and cute was the theme. Sometimes when you search the web or look at a sugarcraft book it seems that you need to spend a heck of a lot on paraphernalia- ball tools, glue, cutters, gum paste and I neither had the money or time to go to Dublin to buy that stuff. This teddy requires only fondant (the regular supermarket kind) and a little food colouring. And a lot of patience and trickery!

Things to remember about teddy anatomy: 
1. His head is oval
2. His ears are small compared to his head- otherwise he will look like a pig. 
3. His "feet" are disproportionately big compared to the rest of his body. The paws are big and round and come out from his body, something which I missed out on this time, I made the feet too small. 
4. His arms come out from just below his head. 

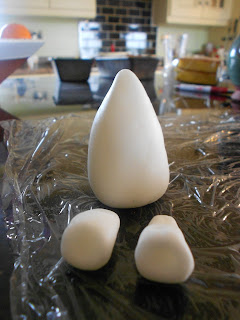
1. For the body mould a tear shaped ball of fondant. For the feet mould two pieces of fondant into small tear shapes. On the small end flatten them out slighly so that they will sit under his body. On the big end of the tear shape make small indents for his paw using your finger or a ball tool if you have it.   

 2. For the arms make two long sausages that get slightly narrower towards the end.


3. For the head make a big oval ball. Make two very small tear shaped drops for ears and a flat circle for his mouth/snout. Stick the flat circle to the bottom of the oval shape with some water and slight pressure. Make two small holes near the back of his head for the ears with a cocktail stick. Put some water on the bottom of the small ear teardrops and put them inside the small holes, moulding together any gaps. Flatten the ears out into small ovals.


4. To assemble wet the feet pieces that are slightly flattening and put the oval body pieces on top of them pressing slightly so that they stick on. Get a piece of spaghetti long enough to go through half of the teddy's body and position it in the centre of the tear drop. Allow about one centimetre of spaghetti coming out of the body because that is where you will stick on the head. 
5. At this stage take a sharp knife and cut one cm off the top off the teardrop around the spaghetti. This will ensure that Teddy does not have a neck- another lesson in Teddy anatomy! 
6. Carefully put your head piece on top of the spaghetti. 
7. Attach the arms by brushing water on the inside of the arms and pressing them gently on to the body. 


8. Now add any detail you like! Make little pink circle for the 'flesh' inside his ears and paws and attach with water. Make two black balls for his eyes and a larger one for his nose.
9. My bear is holding a heart, add any decoration you wish!

The finished product